I. INTRODUCTION
For visual measurement, image quality directly determines the accuracy and reliability of the final measurement results. However, the lighting environment of forging measurement is very complex. Affected by the high temperature radiation, it is difficult to ensure that the images collected at each moment can meet the measurement requirements. Therefore, it is of great significance to evaluate whether the quality of the forging feature image collected in the forging site can meet the measurement requirements.
The meaning of image quality mainly includes two aspects: image fidelity and image intelligibility. Image quality directly depends on the optical performance of imaging equipment, image contrast, instrument noise and other factors, and quality evaluation can provide monitoring means for image acquisition and processing [1]. To evaluate each link of image processing, the research of image quality evaluation has become one of the basic technologies of image information engineering.
There are already mature subjective evaluation technologies and international standards in the world. For example, ITU-T REC.P.910 specifies the subjective evaluation method for multimedia applications. ITU-R BT.500-11 specifies a subjective evaluation method for television images and specifies in detail the test sequence, personnel, distance, and environment during the subjective evaluation of video quality. MOS Mean Opinion Score is the most representative subjective evaluation method of image quality, which judges image quality by the evaluation of observers [2], [8]. The subjective quality score can be divided into two types: absolute evaluation and relative evaluation.
The objective evaluation method of image quality is to establish a mathematical model based on the subjective vision system of human eyes and calculate the image quality by a specific formula.
Traditional objective evaluation methods for image quality mainly include MSE (Mean squared error) and peak signal to Noise rate (PSNR). The mean square error method first calculates the mean square value of the difference between the original image and the distorted image, and then determines the distortion degree of the distorted image by the mean square value.
For the objective image quality evaluation method, usually feature information in the original reference image according to need how many can be divided into the following three categories: full reference, reference and no reference image quality evaluation method of the reference and the reference to be on the basis of the original reference image evaluation method is used to compress image quality evaluation, and not for forging measurement for reference of the original image; As for the non-reference evaluation method, its biggest advantage is that it does not need any original reference image information [3]. However, this method still has the problem that it is difficult to guarantee the accuracy and reliability of evaluation, and it requires the establishment of corresponding evaluation model for different image features to be measured to realize the reliable evaluation of image quality.
II. IMAGE QUALITY EVALUATION MODEL BASED ON TARGET REGION SNR
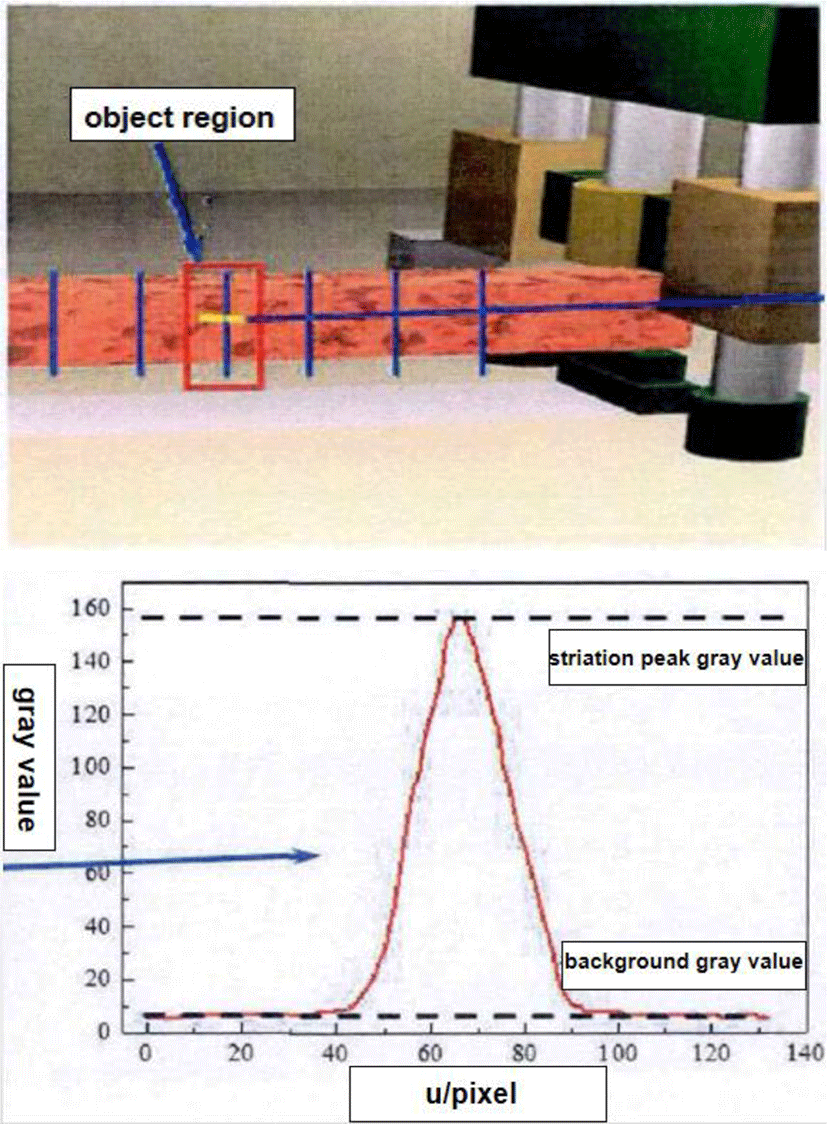
For the measurement of forging image, the forging image taken at each moment is unique, and there is no original image for reference. Therefore, both full reference and partial reference image quality evaluation methods cannot be directly used for the quality evaluation of forging feature image. However, the accuracy and reliability of the existing non reference methods cannot meet the requirements of on-line accurate evaluation of image quality of forging site, and cannot be directly used for the evaluation of forging image [5]. The advantage of the method proposed in this paper is to use the laser strip projected on the surface of the forging to indirectly characterize the geometric parameters of the forging to be measured, as shown in Fig. 1. At the same time, according to the important information that the laser beam intensity, distribution characteristics and other parameters are known in the process of forging image shooting, the known parameters of laser strip are determined as the reference image feature information, and the image quality evaluation model based on the signal-to-noise ratio of the target area of the forging image is established (image signal to noise ratio, ISNR), as shown in Eq. (1):
where Gsl is the peak gray value of laser stripe and Gbf is the average gray value of forging background. In this paper, an image evaluation model based on ISNR is established. The peak gray level information of light stripe in the image target area is defined as the image signal, and the background average gray information in the non-light stripe area is defined as noise. The gray value of the noise in the image is composed of three parts: the radiation light of forging, the ambient light of the scene and the dark voltage noise of the camera. Therefore, the higher the signal-to-noise ratio is, the better the image effect is.
As shown in Fig.1, Signal to noise ratio is the ratio of signal level to noise level. Impulse noise is usually expressed by peak value, while random noise is represented by root mean square. It is abbreviated as SNR. The normalized signal-to-noise ratio is the ratio of signal energy per bit to the power spectral density of noise, expressed in dB. Or refers to the ratio of signal power to noise power at a certain point in the communication system.
However, due to the complex environment of forging site, the image quality of the forging must be changed at any time under the influence of the forging temperature and illumination conditions. In order to further analyze the influence of these interference factors on the image quality from the theoretical point of view, it is necessary to quantitatively analyze the gray value of each feature information in the image and the forging from the perspective of imaging principle, It is necessary to solve the photoelectric conversion characteristic function of camera CCD and the illumination of different characteristic light intensity in forging site.
The image to be tested is directly converted from optical signal received by the lens into analog electrical signal by CCD image sensor to achieve image acquisition. Therefore, the gray value of each pixel in the collected image is determined by the exposure amount and the sensitivity characteristics of CCD chip. According to the photoelectric conversion characteristics of CCD, the relationship between the output signal voltage y and the exposure h received by CCD sensor can be expressed as
where a is the response rate of CCD (V / LX · s), H is the exposure amount (LX · s), γ is the photoelectric conversion coefficient of CCD (γ ≈ 1), yb is the dark voltage (V). For the CCD sensitive chip of camera, a good photosensitive chip should have sensitive light response and low dark voltage. Therefore, aHγ is far greater than yb. The exposure H can be expressed by the following formula:
Among them, ηs (λ) is the photosensitive efficiency of CCD chip, which is a function of wavelength λ. t·E is the illumination at wavelength λ and time t. E(λ,t) varies with wavelength λ and time t. In the process of measuring the pictures taken at the scene, in order to avoid the image blur caused by long exposure, the exposure time is usually very short when the image is collected. In this very short exposure time, it can be considered that the instantaneous illumination E(λ,t) is constant, that is, E(λ,t) can be approximately expressed as E(λ)·t. Then formula (3) can be expressed as follows:
The output signal voltage y of CCD is represented by the gray value V in the image, and under the same exposure time (T), the exposure amount is determined by the illumination e of CCD, then the relationship between the image gray level and the exposure amount can be expressed by the following formula:
Among them, a is the CCD response rate (V / LX · s), K is the gray value of the image under unit voltage (1 / V), t is the exposure time, E is the total illumination of CCD per unit time, t·E is the exposure amount, and γ is the photoelectric conversion coefficient (γ≈L), which is the image gray level caused by dark current. For high quality CCD, ak(Et)γ is much greater than Gb.
To determine the sensitivity characteristics of the camera chip used in this experiment, the relationship between the gray level of the same feature point image under different parameters and the exposure parameters and light intensity of the camera is collected. The structured light strip images with different exposure parameters under the gain of 0 are respectively collected in the laboratory. The gray values of the corresponding image light stripe are shown in Table 1 As the gray level of image No. 32-36 in Table 1 is supersaturated, the corresponding parameters of figures are used for fitting. The fitting results are shown in Eq. (6).
| T=7(ms ) | |
|---|---|
| E(mW/m2) | Gray scale |
| 0.54 | 39 |
| 0.73 | 53 |
| 0.88 | 64 |
| 1.14 | 83 |
| 1.24 | 91 |
| 1.49 | 109 |
| 1.62 | 119 |
| 1.71 | 125 |
| 1.90 | 139 |
| 2.09 | 153 |
| 2.22 | 163 |
| 2.25 | 165 |
| T=10(ms) | |
|---|---|
| E(mW/m2) | Gray scale |
| 0.54 | 56 |
| 0.73 | 76 |
| 0.88 | 95 |
| 1.14 | 83 |
| 1.24 | 91 |
| 1.49 | 109 |
| 1.62 | 119 |
| 1.71 | 125 |
| 1.90 | 139 |
| 2.09 | 153 |
| 2.22 | 163 |
| 2.25 | 165 |
| 0.54 | 56 |
| 0.73 | 76 |
| T=14(ms) | |
|---|---|
| E(mW/m2) | Gray scale |
| 0.54 | 78 |
| 0.73 | 107 |
| 0.88 | 133 |
| 1.14 | 158 |
| 1.24 | 184 |
| 1.49 | 209 |
| 1.62 | 233 |
| 1.71 | 255 |
| 1.90 | 255 |
| 2.09 | 255 |
| 2.22 | 255 |
| 2.25 | 255 |
According to the formula (6), the gray level of the image taken by the camera in this experiment has a linear relationship with the exposure amount of CCD and illuminance. The influence of dark current can be ignored. Therefore, Eq. (5) can be simplified as follows:
The formula (7) is introduced into the formula (1), and the image quality evaluation model (ISNR) is as follows:
Among them, Esl is the total illumination at the position where the camera receives the laser stripe on the forging surface, and Ebf is the total illumination at the position where the camera receives the non-light stripe on the forging surface. Esl and Ebf can be calculated from the known parameters of illumination conditions in the forging site. In order to distinguish the image quality signal-to-noise ratio (SNR) obtained by the analysis of the actual collected forging image and the image quality signal-to-noise ratio (SNR) by theoretical analysis, image quality evaluation model is defined here, and another definition is made be a theoretical image quality evaluation model.
In order to determine the influence of forging temperature change, field illumination condition change, laser assisted light intensity and other factors on the image quality of forgings [6], it is necessary to further study the theoretical signal-to-noise ratio image quality evaluation model (TISNR), which can be expressed as follows:
Among them, El (P) is the illumination that the camera receives the laser reflected light on the surface of the forging, Ef (T) is the illumination of the camera receiving the high temperature forging itself, and Ea is the illumination of the environment light reflected by the forging surface. El (P) and Ef (T) can be calculated directly, and Ea can be calculated indirectly by measuring the field illumination. The specific formula is deduced as follows:
The camera receives the irradiance of high temperature forging itself Ef (T).
The thermal radiation characteristics of high-temperature forgings are similar to those of black body, so the radiation characteristics of high-temperature forgings can be approximately expressed by the formula of black body radiation characteristics. Generally, the functional relationship between spectral radiance of black body and temperature and wavelength can be derived from Planck quantum statistical theory of thermal radiation:
Among them, λ is the wavelength μm, T is the absolute temperature k; h is the Planck constant 6.626176 × 10⁻³⁴W · s2; c is the velocity of light in vacuum (2.99792438 × 10⁸m · s−1); k is the Boltzmann constant (1.380662 × 10⁸W · s · K−1); the first radiation is c1 = 2πhc2 = 3.7418 × 10⁻¹⁶W · m2; the second radiation is c2 = hc/k = 1.4388 × 10⁻²m · K, Substituting the above parameters into:
Taking any element surface ds on the forging surface, the spectral radiation flux Φf of the forging surface can be obtained as:
The spectral radiation intensity If of high temperature forging can be expressed as follows:
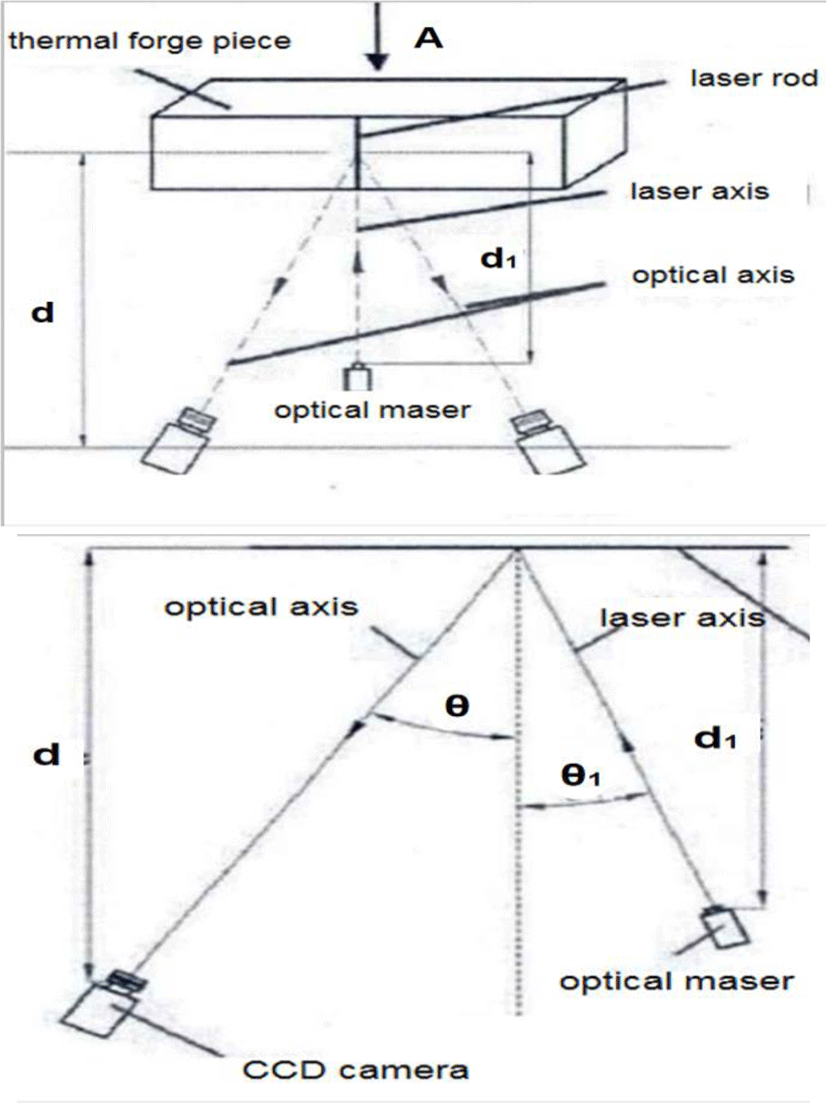
Among them, Ω0 is the total solid angle of the forging micro element surface ds, as shown in Fig. 2. The exit solid angle q of the sensitive area of the lens relative to the origin of the micro element surface of the forging can be expressed by the following formula:
Among them, r is the radius of the lens, d is the distance from the forging micro surface to the lens, and θ is the angle between the normal of the forging micro surface ds and the lens light.
According to the formula (14) and (15), the spectral radiation energy Ωc(λ,T) received by the lens is as follows:
According to the above formula, the spectral irradiance of the forging at the lens can be obtained as follows:
Finally, Eqs. (12) ~ (13) is introduced into Eq. (17), and the spectral irradiance of forging at lens can be expressed as follows:
After considering the sensitivity of the camera CCD chip and the unit wavelength transmittance of the filter, the total irradiance Ef(T) of the camera CCD chip receiving the high temperature forging can be obtained as follows:
Among them, ηccd(λ) is the spectral sensitivity characteristics of CCD chip at wavelength λ, μ(λ) is the spectral transmittance within the filter pass band, and (λmin,λmax) is the pass band range of the filter.
Among them, M0 (λ,T) is Planck black body radiation formula; λ is wavelength, T is Kelvin temperature, ε is surface emissivity of forging, ds is any micro surface on forging surface, θ is angle between ds normal vector and camera optical axis, ηccd(λ) is spectral response characteristic of CCD, μ(λ) is spectral transmittance of filter, Ω0 is total solid angle of forging emission, d is distance between forging and camera, (λmin,λmax) is pass band range of filter.
The camera receives the laser reflected light intensity E1 (P) on the surface of high temperature forging [7].
The illuminance of laser reflected light stripe on forging surface can be obtained by analyzing laser irradiation characteristics and forging reflection characteristics. The illumination El1 of laser stripe on the surface of forging is expressed as follows:
Among them, Pl is the laser output power (W), s is the irradiation area of the light strip at the forging (m2), d2 is the distance between the laser and the forging (m), and θ1 is the angle between the laser output optical axis and the normal direction of the irradiated forging surface, as shown in Fig. 2. The laser reflected light emissivity of forging surface is Ml, ε is the surface emissivity of forgings.
The calculation process of irradiance El2 of receiving laser reflected light at the lens is the same as formula Ef(λ,T), that is, El2 can be expressed as:
Taking into account the sensitivity of the camera and the luminous efficiency of the filter, the camera receives the laser reflected light intensity El(P)on the surface of the high-temperature forging piece as follows:
The surface emissivity of forging ε is laser power, P is any micro surface on the forging surface, ds is the angle between the normal vector and the optical axis of the camera, θ is the angle between the normal vector of the forging surface and the laser incident direction, ηccd(λ) is the CCD sensitivity response value when the laser wavelength is λ, μ(λ) is the filter transmittance when the laser wavelength is λ, d2 is the distance between the laser and the forging, Ω0 is the total solid angle of the forging part emission, and d is the distance between the forging piece and the camera.
Camera receives ambient reflection illumination Ea on the surface of high temperature forging: Similar to the solution process of camera receiving laser reflected illuminance El(P) on the surface of high-temperature forgings, the ambient reflected illuminance Ea can be expressed as follows:
Among them, E is the illumination measurement value of ambient light after passing through the filter, ε is the surface emissivity of forging piece, θ is the angle between ds normal vector and camera optical axis, ηccd is CCD spectral response coefficient, Ω0is the total solid angle of forging emission, and d is the distance between forging and camera. All parameters involved in formula (19), (23), (24), except forging temperature T, filter pass band range (λmin,λmax) and filter spectral transmittance in formula (19), laser output power μ(λ) in formula (24) and illuminance measurement value P of ambient light behind filter in formula (24), other parameters are related to hardware and space layout of measurement system Number, which is a constant after the system is built. Among them, ηccd is determined by camera CCD chip, ε and Ω0 are determined by forging material characteristics, shape and other factors, d1, d2, θ and θ1 are determined by the layout of measurement system, which can be measured respectively after the measurement system layout is completed. According to the theoretical image quality evaluation model TISNR, the main factors affecting the image quality of the forging are the impact of the forging radiation intensity and the environmental interference light, and the light intensity of the auxiliary laser is also a key factor affecting the image acquisition quality [9].
III. CONCLUSION
It can be seen from the above section that the higher the signal-to-noise ratio of the image quality evaluation model established in this paper, the clearer the image is. Several key factors affecting the signal-to-noise ratio of the collected image are forging temperature T, the selected imaging spectral band range (λmin,λmax) ,laser output power P, and the interference light intensity of the scene environment E. Therefore, in order to obtain a clear forging image which can meet the measurement requirements, it is necessary to determine the imaging spectral band range, laser power and other parameters. Therefore, firstly, the radiation characteristics of forgings under different temperatures and wavelengths, the photosensitive characteristics of CCD camera, and the light transmission characteristics of common filters are analyzed. Then, the image quality evaluation model proposed in the previous paper is used as the evaluation standard, and the forging image acquisition method meeting the minimum signal-to-noise ratio is proposed. Finally, the appropriate passband meeting the measurement requirements is determined Range and laser output characteristic parameters. In conclusion, the theoretical signal-to-noise ratio image quality evaluation model proposed in this paper can directly analyze the variation law of the theoretical image quality signal-to-noise ratio when the forging temperature, auxiliary laser intensity and filter pass band range affect the image acquisition quality, which provides a theoretical basis for the realization of clear forging feature image acquisition in forging field.
In the future experimental work, the corresponding clear image acquisition method can be established based on the image quality evaluation model provided in this paper, and the image acquired by the image acquisition method can also be evaluated by the evaluation method proposed in this paper.

