I. INTRODUCTION
Image stitching is a technique for combining multiple images into one single image captured from different cameras (sources) to generate a panoramic image. Image stitching can reduce redundant information in multiple sets of images, increase the image storage capability, and enable more effective views of the real world [1]. Due to the numerous advantages, image stitching is widely used for self-driving cars/drones, 3D mapping, defense systems, and medical imaging [2] – [4]. However, due to the intense computing most of the image stitching hardware has been implemented with extremely high cost servers or high performance, multi-GPU/DSP platforms which require enormous computing and power usage [5] – [8].
On the other hand, the demands on customized image processing hardware that can perform more specific tasks are increasing due to emerging applications such as unmanned vehicles, remote sensing, and mobile computing, where the memory size, computational resources, and power are all limited [9]. That is, specific hardware implementation is needed when general purpose computers are not suitable due to constraints on speed, size, and energy consumption. In this case, even the general purpose GPUs cannot be used due to the power consumption that can easily exceed 100W. However, while image stitching platforms can be easily implemented on general purpose computers, hardware implantation imposes many challenges due to the contradiction between limited hardware resources and the requirements for high performance. As a result, it is still challenging to realize image stitching, hardware for embedded real-time applications. Another difficulty that limits the hardware implementation is that accurate performance – computation speed, power, and area estimation is not easy in the early design stage. This is only possible after the gate or transistor level implementation has been completed. Although there are open source hardware description language that support image processing algorithms such as the VHDL, it is a time consuming job to convert the VHDL code into the circuit level and run a series of simulations to figure out the hardware performance. To make matters worse, this iteration should to be repeated several times to end up with an optimized hardware performance. Therefore, in order to extend the applicability of the hardware-based image stitching platforms, there is an urgent demand for finding new design approaches that can facilitate the hardware design.
In this paper, an algorithm for area-based image stitching is proposed, which does the comparison of two images, find the overlap and stitch two images. Comparing two images takes more computations when compared to other two steps, which can be reduced by image binarization. In addition to that we reduced the image size by scaling. Further, we propose a virtual prototyping design approach for an area-based image stitching hardware. With the proposed approach, the overall structure, size, and computation speed of the actual hardware can be estimated in the early design stage. As a result, the optimized virtual hardware facilitates the hardware implementation by eliminating trail design and redundant simulation steps. Furthermore, the performance of the proposed virtual hardware has been compared with software-based image stitching algorithms.
II. AREA-BASED IMAGE STITCHING WITH BINARY IMAGES
This section describes the area-based image stitching algorithm using binary images (1-bit pixels) which can speed up the computation by simplifying the operations. In this case, pixel comparison between the two images can be realized with a simple logical operation instead of subtraction and multiplication. The area -based image stitching algorithm is converted into a virtual hardware, where the hardware size and computation time can be estimated.
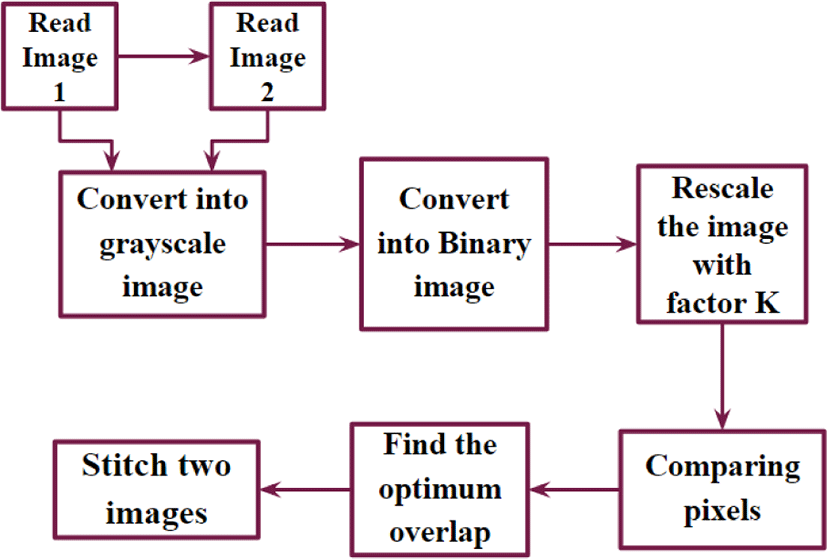
Figure 1 shows area-based image stitching algorithm. First two input images (24bit color) are read which have overlapping area. A pixel color in an image is a combination of three colors Red, Green, and Blue (RGB). The RGB color values are represented in three dimensions XYZ, illustrated by the attributes of lightness, chroma, and hue. The quality of a color image depends on the color represented by the number of bits the digital device can support. If each Red, Green, and Blue occupy 8 bits, then the combination of RGB occupies 24 bits and supports 16,777,216 different colors. The 24 bits represent the color of a pixel in the color image. The grayscale image has represented by luminance using 8 bit value. The luminance of a pixel value of a grayscale image ranges from 0 to 255. The conversion of a color image into a grayscale image is converting the RGB values (24 bit) into grayscale value (8 bit).
Furthermore, the gray scale (8 bit) input image is converted into binary images. The binary image can be obtained by comparing each pixel with a threshold level – usually the mid-level of the minimum and maximum pixel value, and representing the pixel value with either 1 (pixel intensity greater than the threshold) or 0 (pixel intensity less than the threshold), where 1 and 0 stands for the white and black level, respectively. In this case, the threshold, 128 is suitable for our application since it still preserves useful information. In addition, by using binary images, the amount of computations to compare every pixel of two images is significantly reduced, which enables a very fast image stitching.
In addition, the size of the binary image area reduced by using a scaling factor K. To rescale the image, consider a KxK pixel data in sequence, such that all the information of the image is maintained. Each KxK data is replaced with a single bit (1 or 0). If 1 is occurring more pixel than 0 in KxK pixel data, replace the KxK pixels with 1. Similarly, if 0 is occurring more pixels, replace KxK pixels with 0. In this way we can reduce the original binary image (size MxN) to M/K×N/K.
Next, we start comparing the two M/K×N/K sized images. Each pixel in the image is being compared to all the pixels in this case. An XOR operation is used to compare the pixels. How to compare the two images is fully discussed in section 2.2 and 2.3.
After comparing two images we can find the optimum overlap between the two images. When two pixels that are compared are same the XOR operation output is 0. If the two pixels that are compared are not same the XOR operation output is 1. All the pixels that are compared are added and divided by the number of comparisons (i.e., average of XOR outputs). Since XOR operations states that same inputs 0 output, the overlapped area gives the 0 output or the maximum overlapped area gives the minimum average value. Therefore, the minimum average value is used to determine the optimum overlapped area.
After finding the optimum overlapped area of two images, we use grayscale images for stitching. Using grayscale data takes more time for finding the optimum overlap area. Thus we only use binary images for comparing the pixels and finding the overlapped area. Finally, the stitch image is obtained by removing the overlap area in the image-2, and concatenating the two images
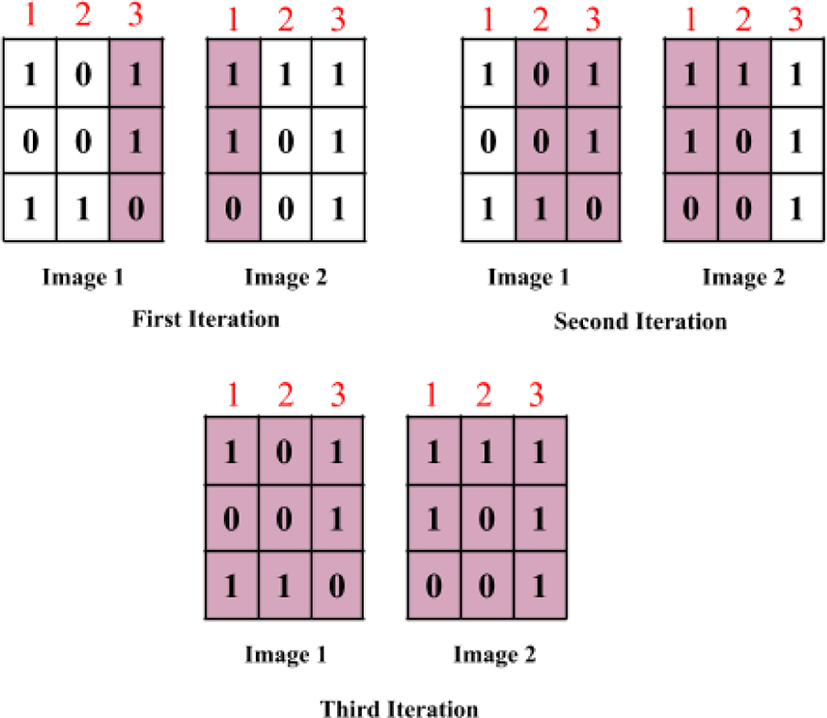
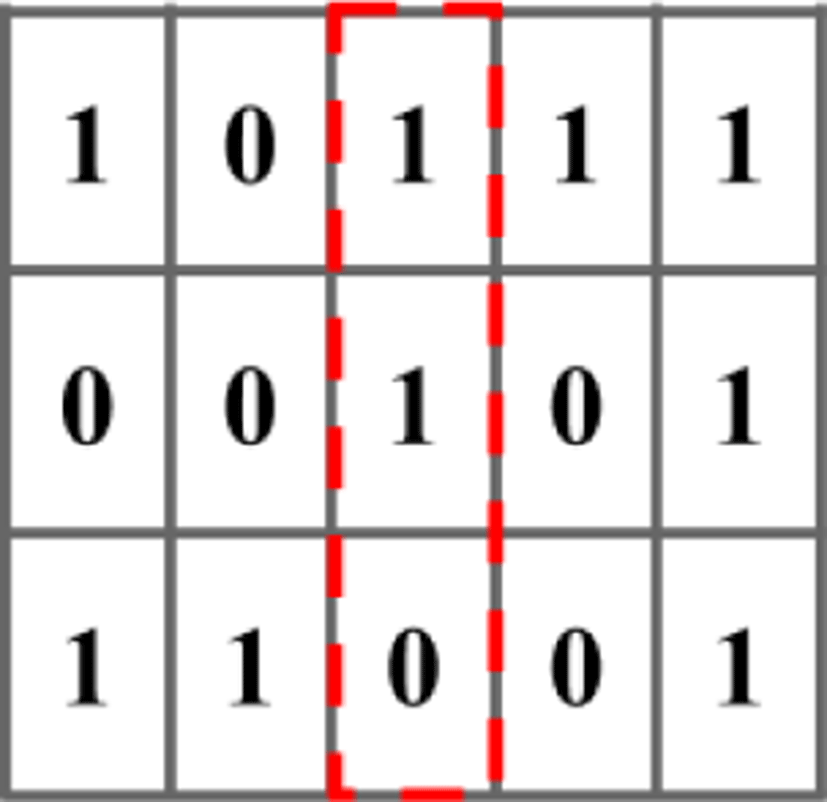
Area-based image stitching can be performed in either one dimension or two dimensions. Figure 2 shows the one dimensional approach, where a 3X3 image is considered for simplicity. In one dimensional approach, the image is being shifted either horizontal or vertical direction only. In this example, the image-2 is shifter horizontally. During the first iteration, column-3 of image-1 and column-1 in the image-2 are compared. The shaded pixels indicate the pixels being compared. The two pixels in the shaded area (each from image-1 and image-2) are compared, which is realized by XOR operation. The result is 0 when the two pixels match otherwise the result is 1. Next, the XOR results are all added up and divided by the number of comparing pixels, (for first iteration 3). This value corresponds to the average of pixel comparison of each iteration. Similarly, in the second and third iteration, 6 and 9 pixels (each from image-1 and image-2) are compared. After comparing all the pixels, the averages of pixel comparison at each iteration are again compared, where the minimum average value leads to the optimum overlap. It is observed that from figure 2, first iteration average value is 0, second iteration average value is 0.66 and the third iteration average value is 0.55. Therefore area compared in first iteration has overlap. Figure 3 shows the one dimensional image stitching results based on the optimum overlap. The overlapped area highlighted in red color.
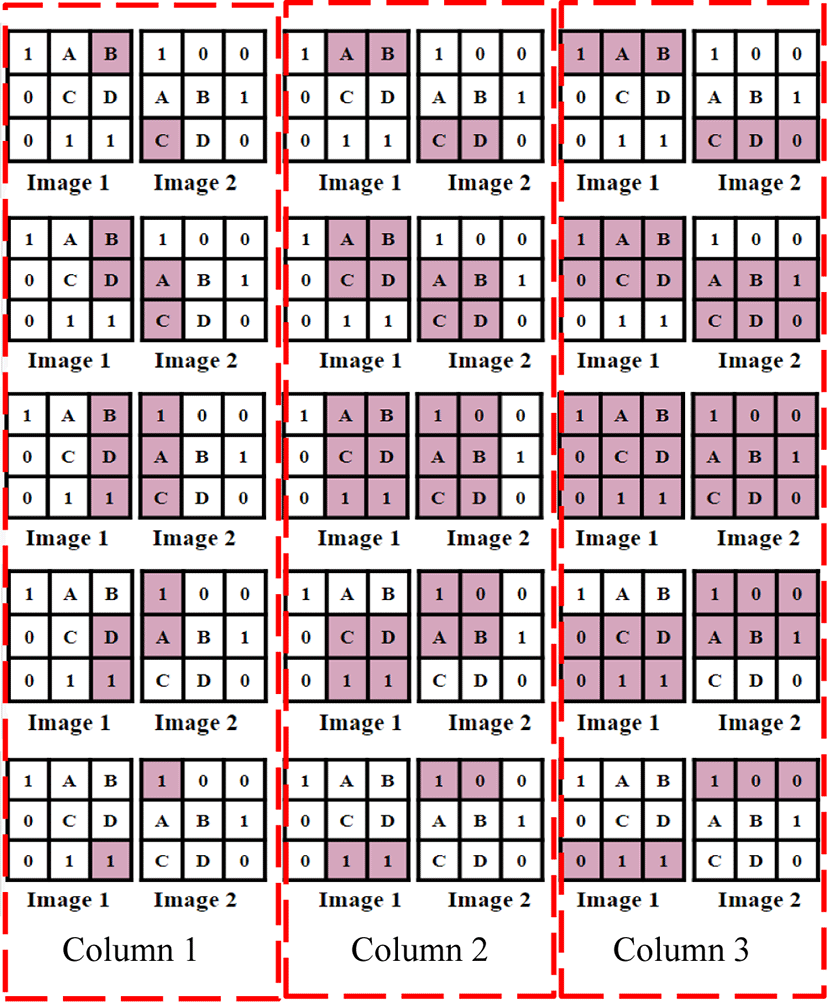
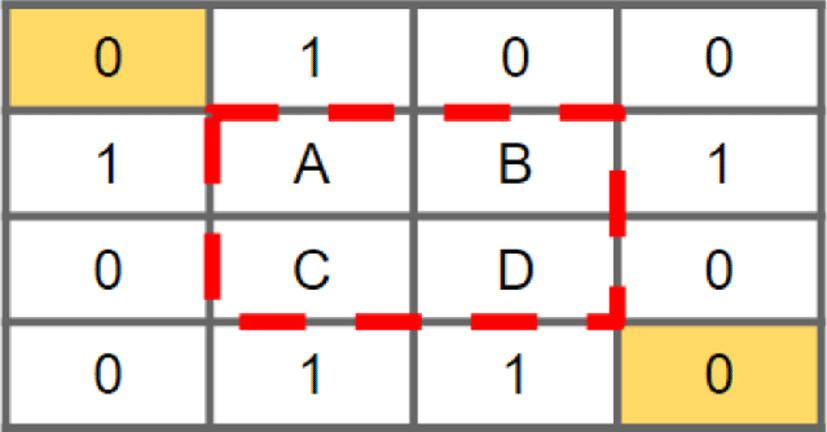
For the one dimensional image stitching, image-1 and image-2 are shifted in the horizontal direction to vary the pixel positions to be compared. However, in the two dimensional image stitching, image-1 is shifted both in the horizontal and the vertical direction to vary the pixel position to be compared. As a result, it is more accurate than the one dimensional case, though this leads to more complicated computations. Figure 4 shows the two dimensional image stitching algorithm using two 3X3 images, where the shaded pixels indicate the pixels being compared. Similar to the one dimensional case, there are column 1, 2, 3 overlaps (obtained by just shifting image-1 horizontally). However, in addition to this for each column overlap, image-1 is shifted vertically that ends up with 5 different areas being compared. Therefore, there are total 15 iterations (5 iterations for each column overlap). The procedure for finding the average of pixel comparison for each area being compared is exactly same as the one dimensional case. Assuming the second iteration of column 2 overlap shows the minimum average of pixel comparison among the other overlap cases, the two dimensional image stitching result is shown in figure 5, where extra 0’s are filled at the blank area that are generated after combing the two images (the two yellow pixels). The overlapped area (pixels named A, B, C, D) is highlighted in red color.
III. VIRTUAL PROTOTYPING OF AREA-BASED IMAGE STITCHING ALGORITHM
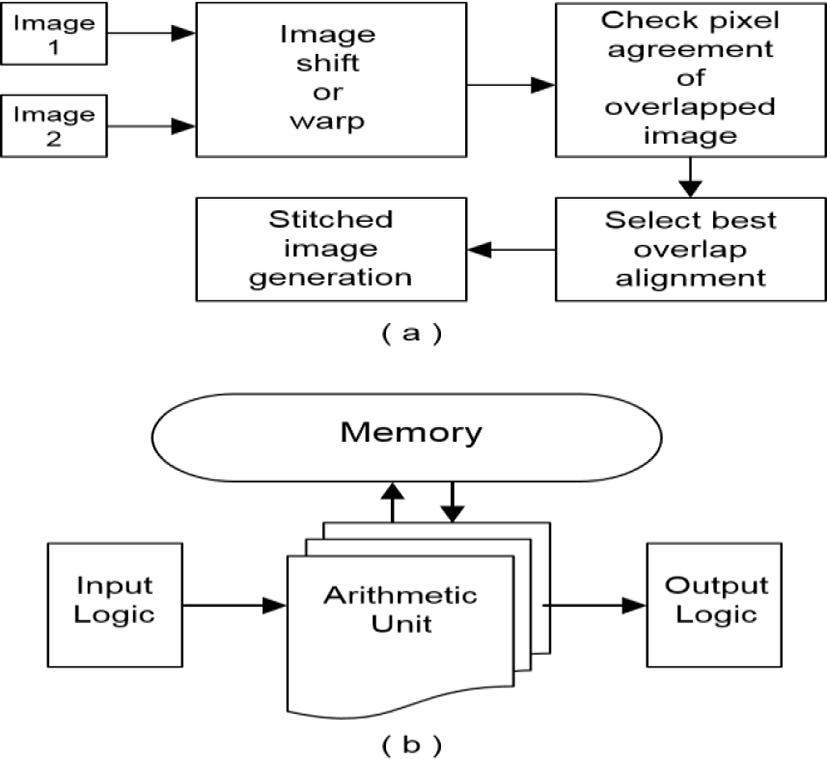
The basic concept of the proposed virtual prototyping is converting the conceptual or algorithm level image stitching platform into an actual hardware that consists of the memory, logic, or arithmetic unit. In addition, this allows estimating the memory size, number of adders, subtractors, and logic gates that are present in the image stitching hardware. Figure 6 shows the concept of the proposed virtual prototyping which is applied to an area-based image stitching algorithm, where Figure 6 (a) shows the conceptual representation of the algorithm and Figure 6 (b) shows the resulting virtual hardware obtained through virtual prototyping. The virtual hardware is equivalent to the area-based image stitching algorithm which performs the same operation, however the conceptual blocks are replaced with actual circuit components such as the memory, logic gates, and arithmetic unit. As a result, from the virtual hardware, the size and computation time of the actual hardware can be estimated. The virtual prototyping approach facilitates the hardware design by image processing circuits by enabling performance estimation at the early design stage.
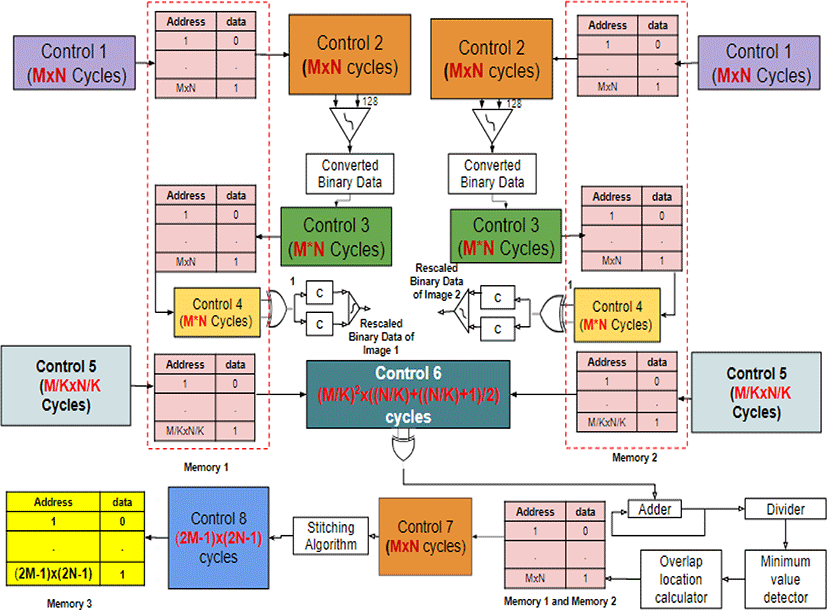
A virtual hardware platform is designed for the proposed area-based image stitching algorithm. Figure 7 shows the virtual hardware of area-based image stitching algorithm for the MXN image. Three different memories are used to store the image data. Memory-1 is used to store the image-1 data throughout the process. Similarly, memory-2 is used for image-2. The stitched image data is stored in Memory-3. Memory-1 and memory-2 are indicated in pink color. And memory-3 is indicated in yellow color at the bottom left corner. Writing and reading for memory-1 and memory2 is performed simultaneously. Since two memories are used, the computation time to read and write operations is halved. Control 1 block is used to write the grayscale image data (0 to 255) into memory-1 and memory-2. The converted grayscale image data are written into the memories. Next control 2 block is used to read the grayscale image data from memory-1 and memory-2 to convert grayscale image data into binary data (1 or 0).
A comparator is used to compare each grayscale pixel in the image-1 and image-2 with 128. If the value of the grayscale image data is less than 128, output of the comparator is 0, if the value of the grayscale image data is greater than 128, and the output of the comparator is 1. Next, control 3 block is used to write the converted binary data into the respective memories, which is represented as the green color. Writing the binary data into the memories is realized in a pipelining process. Reading the grayscale data, converting the grayscale into binary takes 1 cycle. In the next cycle, reading the grayscale data and writing the previously converted binary data into the memories is performed. This process continues until all the grayscale image data is converted into the binary data.
Now we need to scale the binary data with the scaling factor K (2, 4, 8, 16, etc.). Reducing the size of the image is helpful for reducing the computation time. We used different scaling factors and found that, the scaling factor K cannot be more than 8. If K is greater than 8 (i.e., 16 or 32 etc.), the image information is changed while rescaling, which may not lead to the accurate image stitching result. This conclusion is made based on MATLAB results. To rescale the image, we used a combinational circuit with XOR gate, two counters and a comparator. Control 4 block is used to read the binary data, which is in yellow color. To scale an image we read KxK (2X2 or 4X4 or 8X8 etc.) image data and compare each bit with 1, for comparing we used XOR gate. The XOR gate output can be 1 or 0, which is applied to the counters. There are two counters C in figure 7, which counts the number of 1’s and the number of 0’s. Next, we compare the total number of 1’s and 0’s using a comparator. The highest occurrence of data (1 or 0) is called the rescaled binary data, which is written into the respective memories. Next, write the rescaled data simultaneously into the memory immediately after comparing the last bit. Control 5 block is used to write the rescaled binary data. Now we are fetching the data from memories to compare the images and find the overlap.
Comparison to find the overlap between two images is being performed at this point. Read the binary data as explained in figure 4 (the shaded pixels). Control 6 block in figure 7 shows the control to read the binary data of image-1 and image-2 from the memories. Comparing the pixels in hardware implementation is realized by a combinational logic with XOR gate, adder and divider. Each area is compared with XOR gate and the results are summed using an adder. Next, a divider is used to divide the added value by the number of comparisons performed. For the example used (3X3 image) we get 15 divider outputs. There is no need to use another memory to store the average values of the compared areas. Figure 7 shows the logic to find the minimum, and further used to find the position of the overlapped area. The minimum value of the divider output is considered to be overlapped area. There is a possibility to be more than one minimum value. There is also the possibility of overlapping more than one arrangement that has the minimum pixel comparison average. In this case, the overlap with the maximum number of pixels is selected as the optimum overlap. Furthermore, the location and size of the optimum overlap area is obtained by the overlap location calculator block, which consists of combinational logic. After finding the optimum overlapped area, control 7 block is used to read the grayscale image data to perform the stitching operation. Since the binary image is not clear for naked eye, we use grayscale image data instead of binary data to stitch two images. Stitching operation is realized with a combinational logic. Control 8 block represents the control to write the stitched data into memory 3. The yellow color represents memory 3.
IV. COMPUTATIONAL COST
The computational cost of virtual hardware can be calculated depends on the number of cycles taken to perform each operation that is shown in Figure 7. We considered MxN image to perform the analysis
Writing and reading operation in memory-1 and memory-2 is performed simultaneously. It takes M×N cycles to write the grayscale image data into the memories, to read the grayscale image data from the memories to convert into binary data, reading the grayscale data (M×N), converting grayscale data to binary data and writing the binary data (+1) into the memories can be realized using pipelining. It takes M×N+1 cycles to read and write the converted binary data into the memories. Reading KxK binary data bits to rescale the binary image also takes M×N cycles. Again, we can write the rescaled bit into the memory using pipelining. Writing the rescaled data also takes M×N+1 cycles.
The number of cycles to read the binary data from the two images to perform comparison (XOR operation, addition and division) is given by.
After comparison and finding the optimum overlap, to stitch the images we need to read the grayscale image which takes M*N cycles. To write the final stitched image data (i.e., to be displayed) takes (2M-1) * (2N-1) cycles. This equation gives the worst case scenario of the overlapped area (i.e. if the overlapped area is only one pixel). The total number of cycles required to perform image stitching is given as.
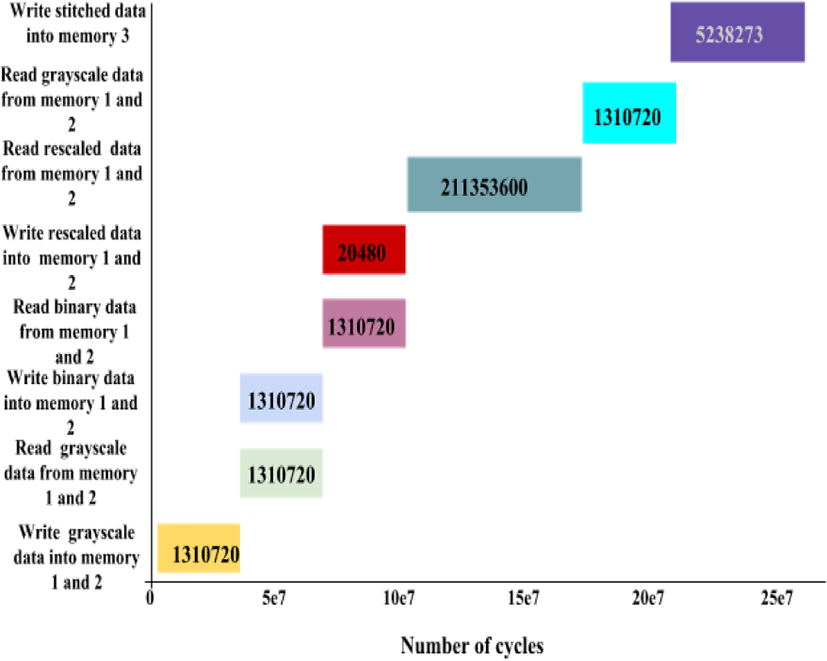
Figure 8 shows the computational cost of stitching 1280x1024 sized image. We considered M=1280 and N=1024 in the above analysis and calculated the number of cycles required for each operation.
V. RESULTS
The actual size and computation time of the area-based image stitching, hardware can be estimated from the virtual hardware. Table 1 shows the estimated computation time of the area-based image stitching, hardware compared with the software algorithm realized using MATLAB. The computation time of the virtual hardware is obtained by using equation 2 with different clock frequencies (250MHz, 500MHz, 750MHz and 1GHz) and image scaling factor K (2, 4, 8, and 16). The computation time decreases as the clock frequencies and scaling factor K increases. However, increasing K has the risk of losing the useful information contained in the image, thus can lead to poor stitching results.
Based on the simulation results, K=8 still gives good stitching quality with relatively fast stitching time. With K=8 and clock frequency of 250 MHz, the computation time of the virtual hardware shows 0.887 Sec which is 10x faster than MATLAB
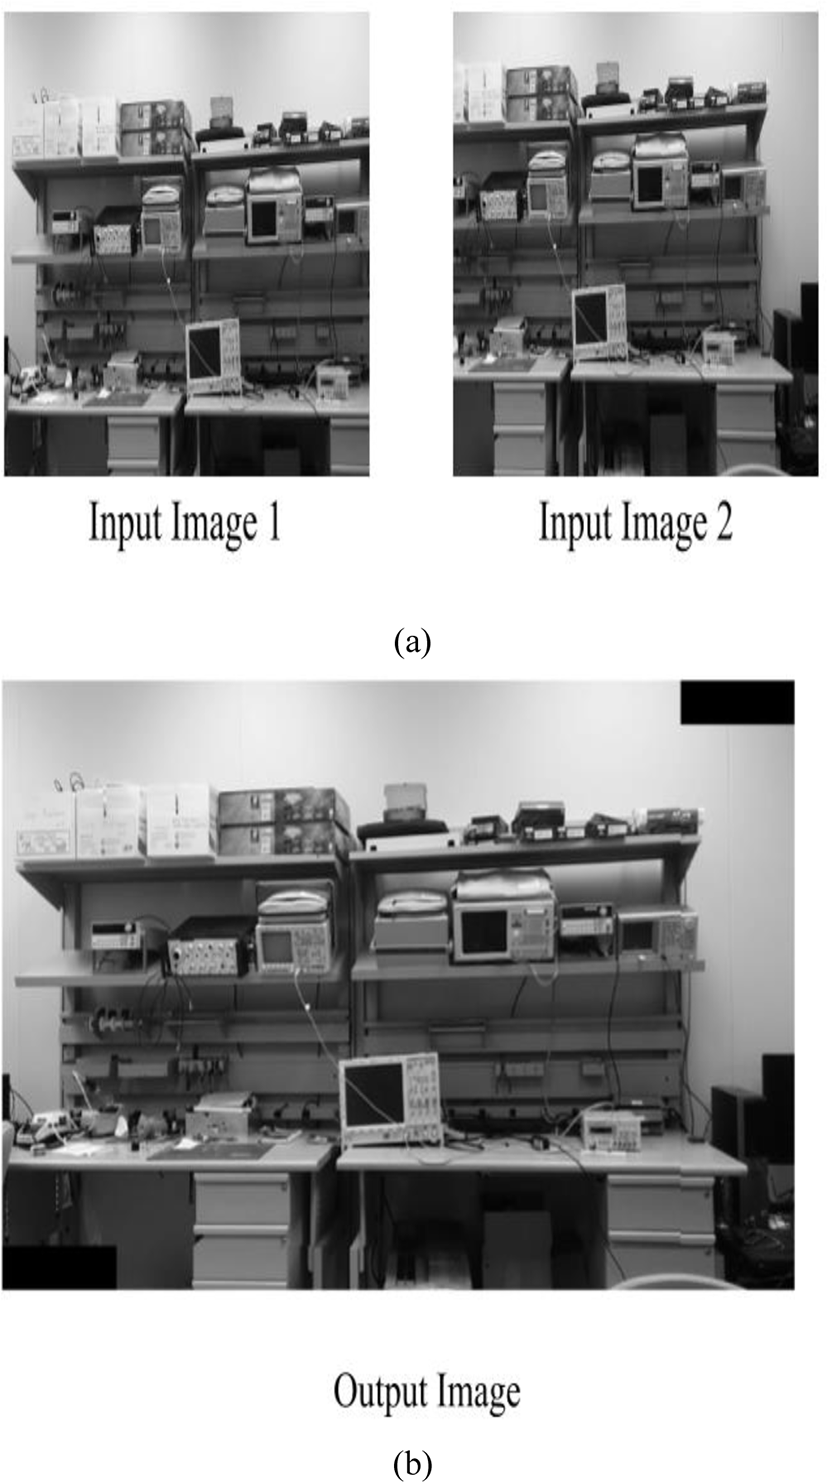
Figure 9 shows the result of two dimensional area-based image stitching. The results are obtained from MATLAB. The input images are shown in figure 9a, here grayscale images are considered as input images, i.e., after converting into a grayscale image to binary image, and the stitched image is shown in figure 9b. It is observed that the stitching operation is implemented precisely and there is no disruption near the overlapped area in the stitched image. After stitching the leftover area is filled with 0 values to make it a complete image (left bottom and right top corners).
VI. CONCLUSION
This work presented a virtual prototyping approach for a fast area-based image stitching hardware platform. If implemented with actual hardware (FPGA or Integrated Circuit). The area-based image stitching algorithm has been implemented in MATLAB and the result was shown. Further the virtual hardware was implemented and the computation cost of software and hardware implementation was discussed. With clock frequency of 250MHz, the estimated computation time of the proposed virtual hardware was 0.877sec, which was 10 times faster than the software-based image stitch platform using MATLAB.


