


I. INTRODUCTION
Nowadays, Radio Frequency Identification systems in healthcare facilitate the possibility of contact-free identification and tracking of patients, medical equipment and medication. In addition, a RFID transponder covering the 13.56 MHz band was adapted to minimize its volume to be placed in the pulp chamber of an endodontically treated human tooth. Patient safety in that case is improved resulting costs and medication errors reduce. In certain cases, the system is applicable for the personal identification procedures for hospitalized patients instead of an identification wristband. The application wireless communication systems could cause a potential harmful electromagnetic disturbances on sensitive medical devices. This risk depends on power transmission as well as adapted data communication methodology. The idea of software defined radio technology application in hospital environment is based on its major functionality parts which are implemented by personal computer or embedded system. A radio communication system where the major part of its functionality is implemented by means of software in a personal computer or embedded system. In several situations, we need a solution which can facilitate saving patient data operation to be used by medical staff on time. For that, we propose a new complex ESP Systems.
The solution is based on Pump Syringe and Electronically injector Modules for Medical Application. The system is developed for use in bio-technology applications [1]. Syringe operates in three modes called fast filling, drain and injection.
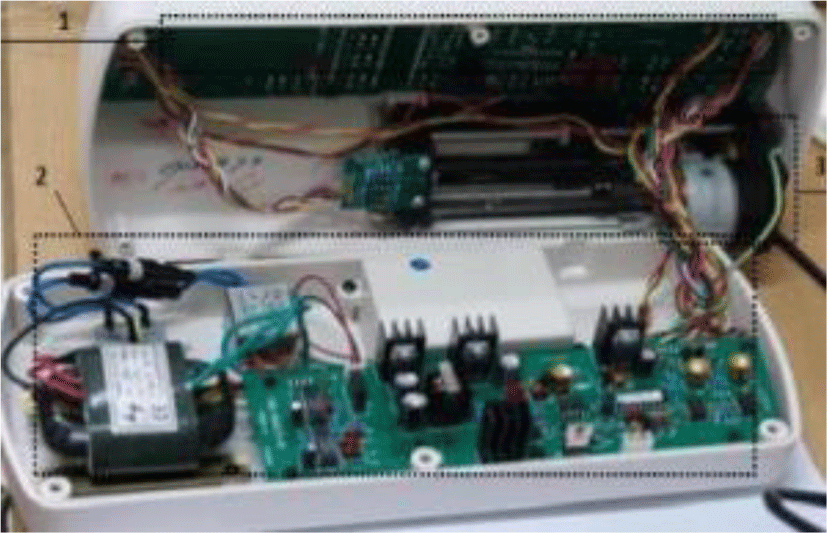
Developed prototype consists of four electronic charts based on a power board; control board, map used for sensors accommodate operation, and a power supply board. A mechanical structure and supervision are provided.
II. ELECTRIC SYRINGE PUMPAND POWER INJECTOR SELECTED ELEMENTS
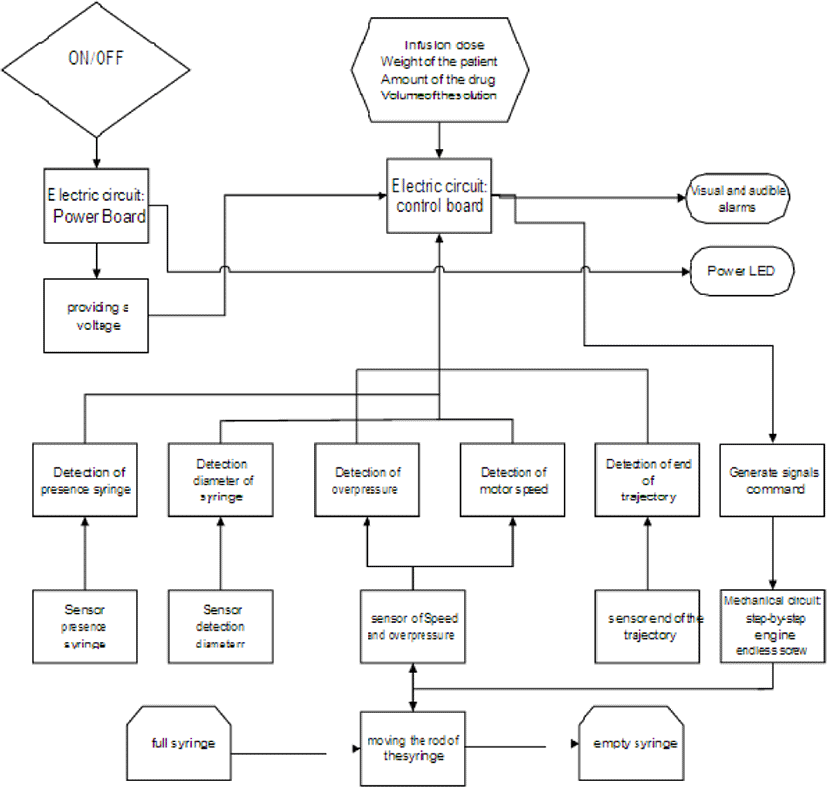
The proposed medical device is composed by an Electric Syringe Pump representing an electronic system. It orders infusions and injections operation automatically. Syringe pushes uses cases include different applications like continuous infusion drugs acting on cardio-vascular function in intensive care units, Infusion of drugs, fluids, or blood to new born and premature infants, injection of hormones, injection permanent an aesthesia, injection of the anticoagulation during hemodialysis body extra traffic action. Hemodialysis and the body extra traffic). Figure 1 describes the ESP external view. The control panel [2] is made of different types of control numbered 1 to 17:
-
Display the infusion rate (ml/h) of a total volume (ml) used syringe (13 models) model and overpressure alarm (OCCL).
-
Indicator by selecting the type of syringe (syringe 20 ml, 30 ml and 50 ml). The syringe capacity is automatically detected by the machine, one of three values depending on used syringe type (20, 30 or 50 ml).
-
we proposed two power supply mode (Sector / battery mode) for the ESP.
-
Values adjustment buttons.
-
Power button.
-
Support syringe: this component allows the automatic syringe type detection.
-
Stop «button: stops the infusion.
-
Start «button: starts the infusion.
-
Tab.
-
Button On the display n°13 /off.
-
Select 2: the patient parameters selection bottom: weight B.
Weight (in kg), the drug amount(mg), Drug. Flight (in mg), solution volume soil, and the ‘Dose’ infusion (μg/kg min).
-
Display of patient parameters.
-
Alarm lamp.
-
Overpressure Display type (occlusion): Level L, Level C, Level H.
-
Alarm off button.
-
Select «button: button selection infusion rate (ml/h), the total volume (ml), used syringe and pressure level (L, C, H).
-
Purge of the medicinal solution button.
We propose the EPS internal in Figure 1, it is mainly composed of three parts.
-
Control card.
-
We consider the Battery that takes over in case of power failure state, it is composed by a fuse (250 mA), step down transformer (220V ~ 50HZ / 17V ~ 10VA), recovery diode bridge, fillter circuit and the Regulators (7805, 7812, 7818).
-
Our developed engines convert a digital electrical signal into an angular positioning of incremental character. We note that each pulse sent by the controller to the power module system translates the rotation of a step of the motor.
In our application, we used step bipolar pushes electric syringe WZ-50C6T engine.
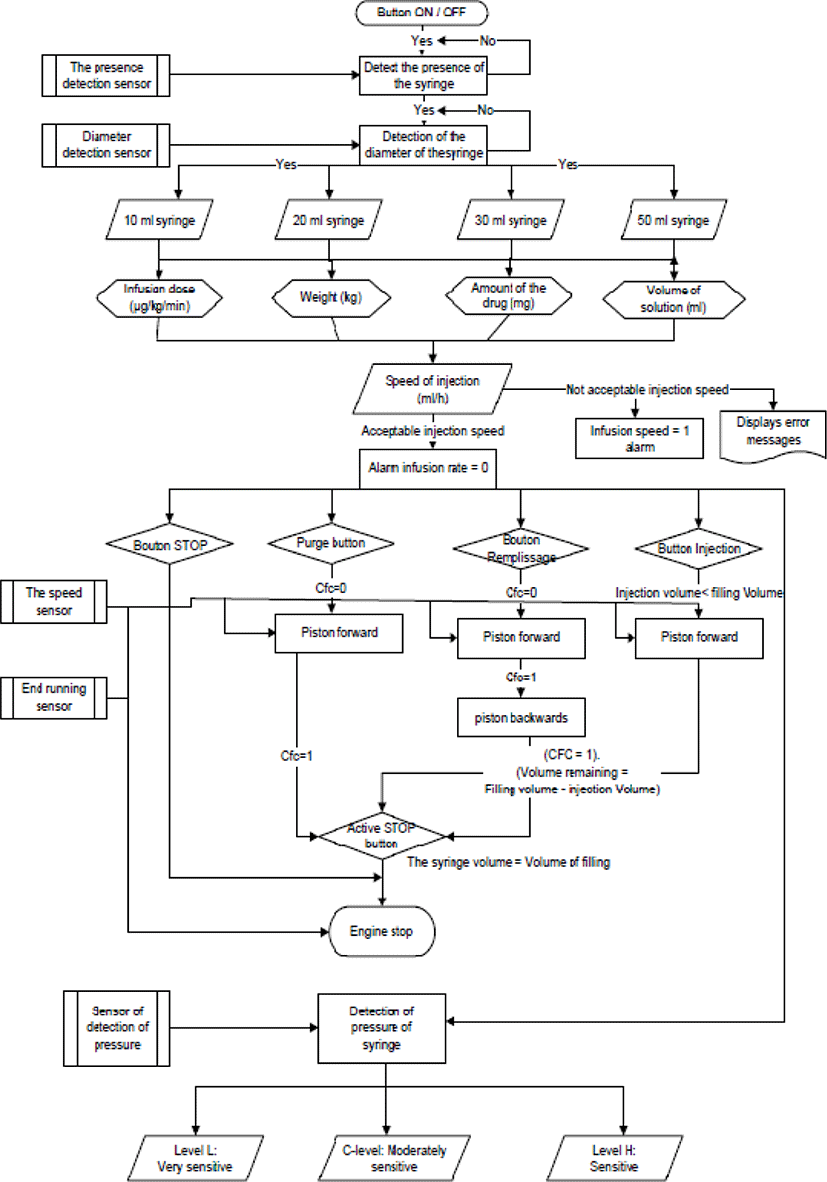
The ESP contains also five sensors which are a validated syringe sensor. The block diagram of the ESP (Fig.2) demonstrates the role of each sensor and corresponding action which can trigger. Our study allowed the ESP functions analyze [3].
The proposed electric injector (EI) is used during scanner (RX) or (MRI) contrast review. It is to inject a drug artificially increasing the anatomical structure contrast to visualization such as a kidney, bladder, cavities intra articular or disease such as a tumor. For Imaging by RX, a water-soluble iodinated product strongly absorbs the x-rays and gives a white signal on the (very) image. For magnetic resonance imaging using gadolinium based products accelerate the relaxation of the protons in water. It translates into one bleaching of a part of the image. The internal view of the injector is composed of three parts (in Fig. 3).
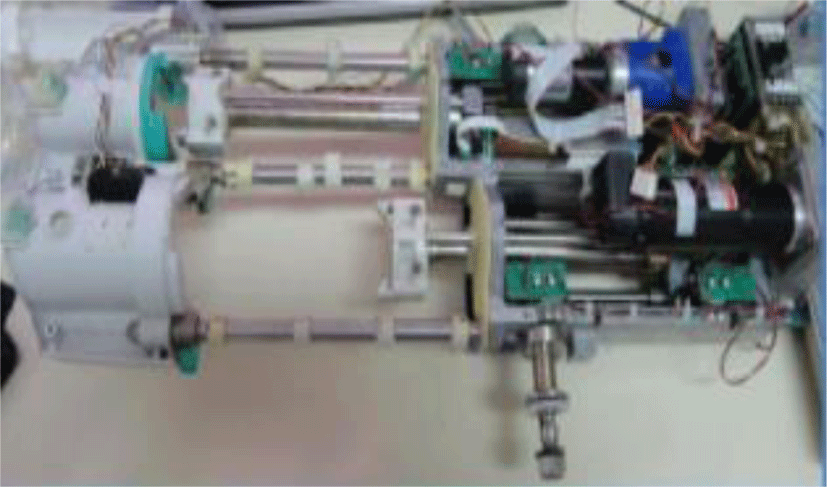
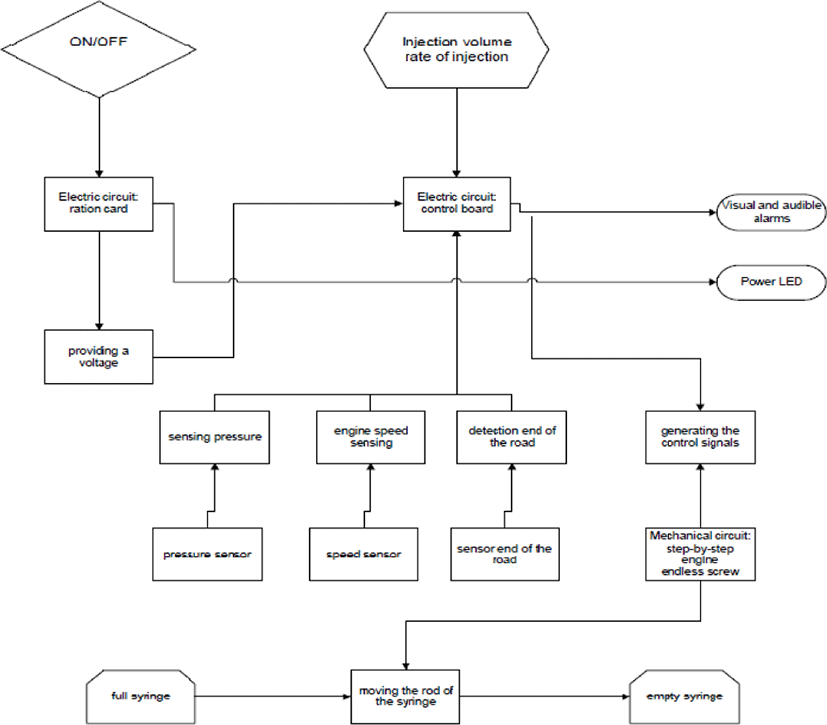
EI Contains also five sensors: Two sensors (infusion) limit, speed sensor (stepper motor speed), two pressure sensors (fluid pressure). The block diagram of the IE is presented, where each sensor role and corresponding action which can trigger is explained.
Our goal is to design and implement a new system that ensures both the electric syringe pump and the electric injector operation. The system introduces the following additional options as development of a database for patients, automation of injection, filling procedure, and detection of high risk patients.
We have replaced the two systems (ESP & EI) by a PC containing an interface of Graphical management. Power Board is responsible for power supply as shown in Fig. 4:
III. DEVELOPMENT OF MANAGAEMENT AND HANDLING INTERFACE
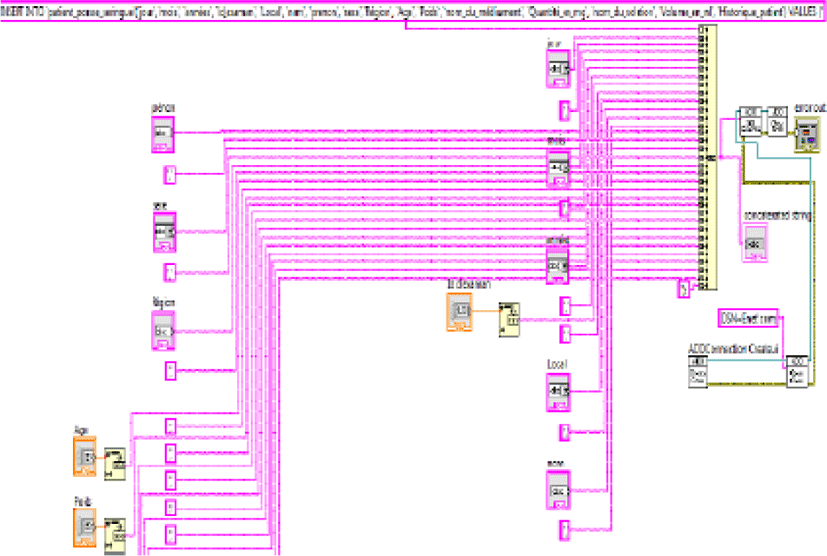
The purpose of the software is to create an interface control and visualization. The user can manage a syringe in two C modes of technology: the Electronic Injector (EI), the Electronic pump syringe which can be done by few tools. To ensure interaction between the hardware and the soft- ware part, we develop a program associated with a data- base database to save the patient’s information. Designed system offers a graphical interface database to ensure the management, monitoring patients and storage their injection operation steps. We successfully developed a program which consists of two linked parts: first a Front Panel which is the interface with the user Human Machine Interface (HMI), composed of graphic objects that allow to view information to control the system, and second a Block Diagram that represents the internal workings. The G language is useful in describing its operation. For data- base MYSQL configure, we follow the instructions steps and we enter a description. If server which is located on the computer, is entering “localhost”. The default port is 3306. The default username called “root”. The default password is empty. Select a database and pressed OK in order to test the connection. So, the database [4] in that case appears in the list of sources of user data.
The diagram that represents the various developed interfaces. Initially there has the identification interface and the chosen interface technology [5], [6] to go after either IE interface technology. As a first step, we pass or interface access to a patient or the patient new interface chosen in this case the interface command IE directly either through interface protocol which contains several interfaces [7] for each protocol injection of the contrast material) that offers insert direct injection settings, so that subsequently skips [8] to the interface command IE. For the PS technology interface [9], it passes either interface access to a patient a new interface, so we choose in this case the PS command interface directly [10].
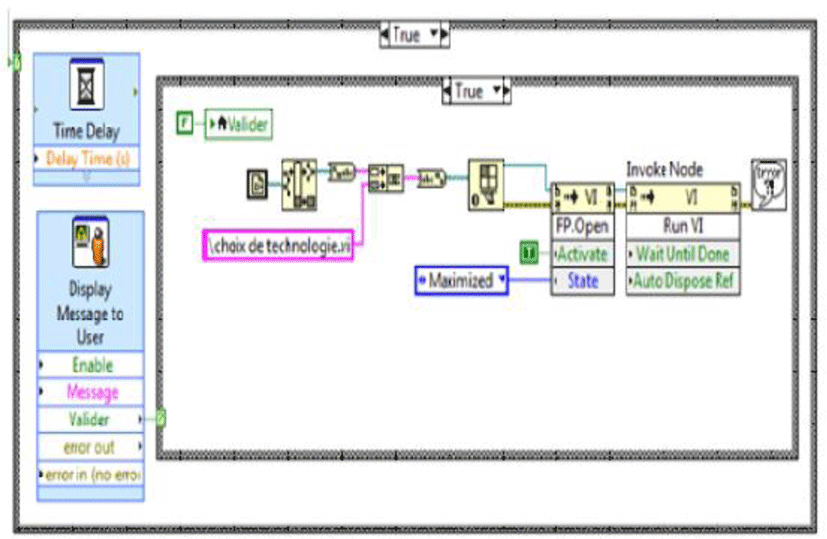
When we insert in the interface of the auto- identification, the login and the password, the code in the diagram search for the existence of an id in SQL for login and password inserted [11-12], if the latter do not exist in MYSQL so, reset the login and password [13], otherwise it displays a message “well come” then skips to the next vi “Chocie of technology” [14-15] by the ode shown in Figure 6.
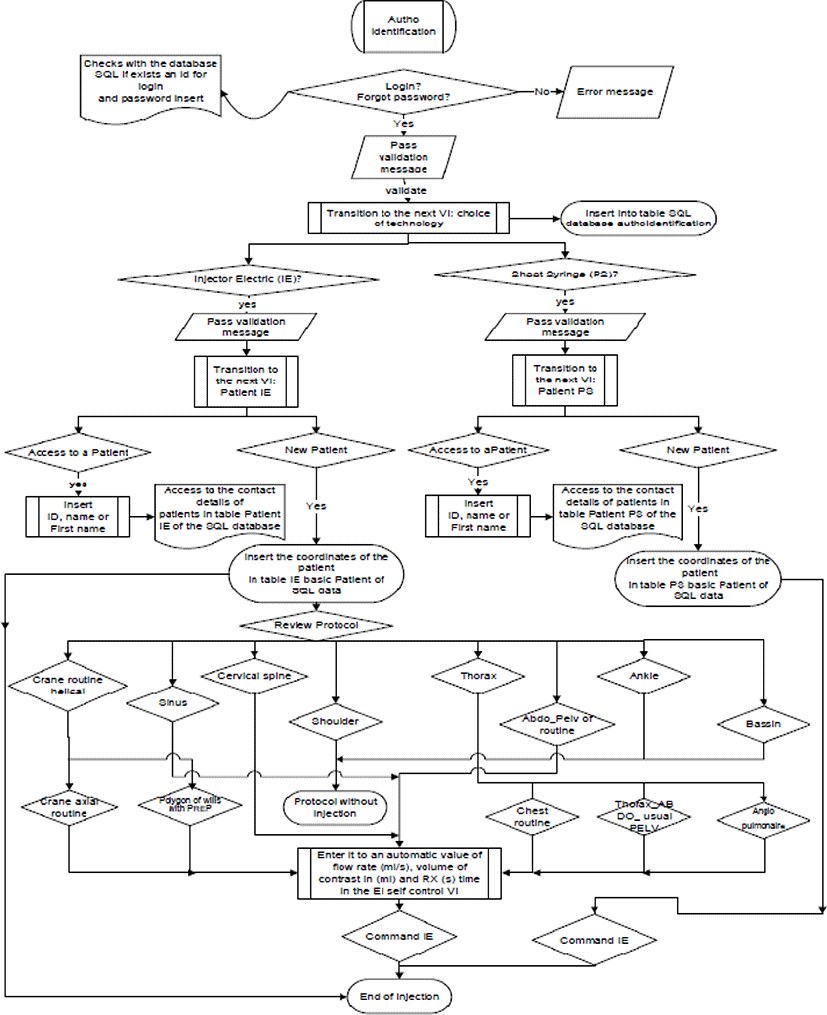
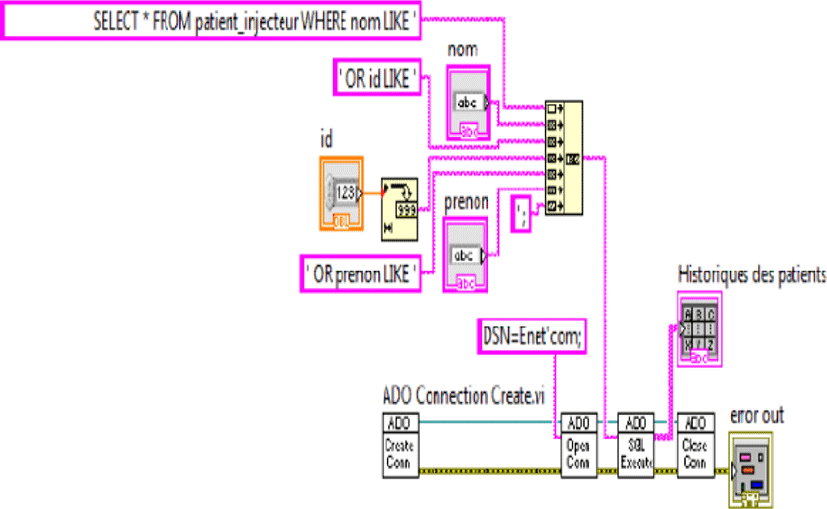
After authentication, the user (doctor) is able to access to the electric injector or electric syringe pump access. After technology selection [16-18], we can add a new patient in our database or search a registered patient, and my MYSQL which is done by the code as in Figure 7.
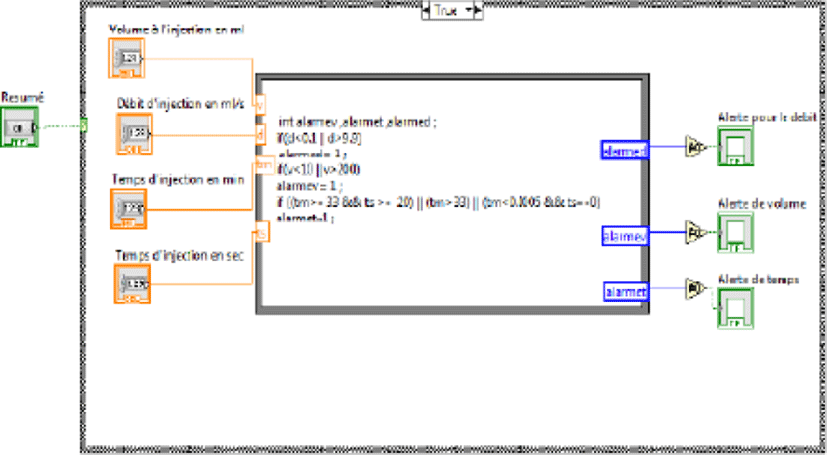
Injection to a new patient is given when, we tested the manipulation possibility. These steps are detailed in the diagram Figure 8, if the required fields (id, the patient’s illness, age, sex, weight) are fulfilled then a message is displayed’ data- base is accepted [19], we subsequently make patient condition verification.
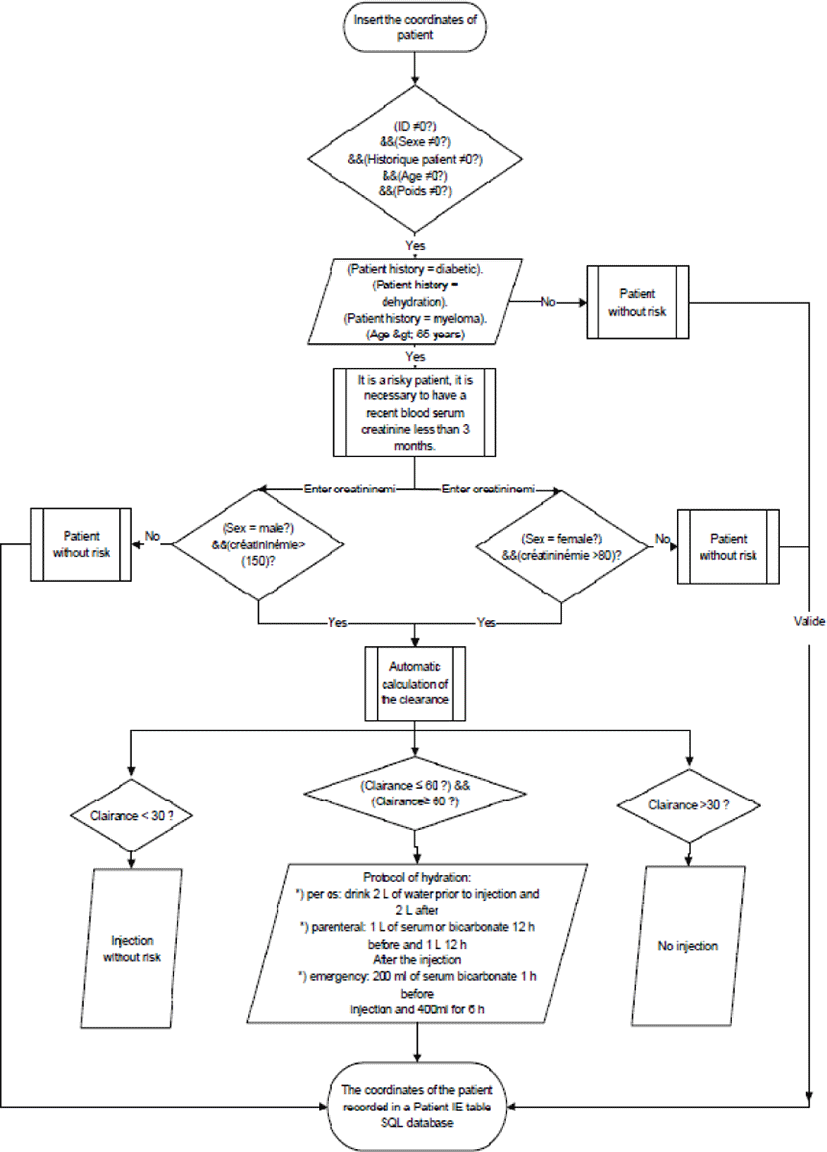
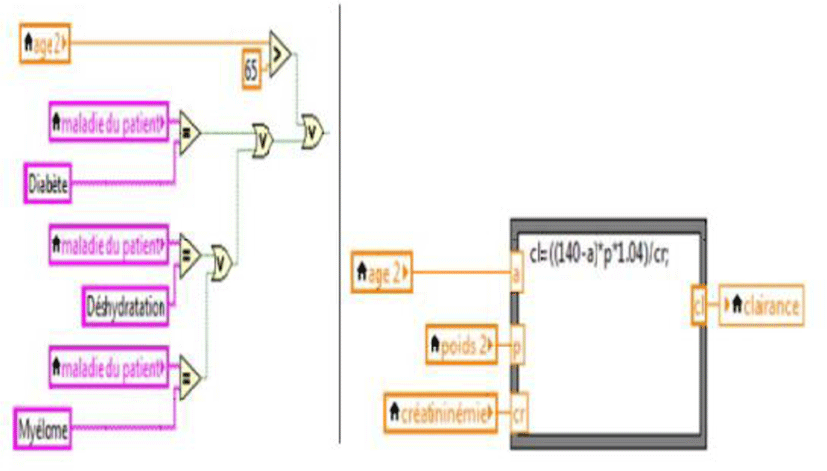
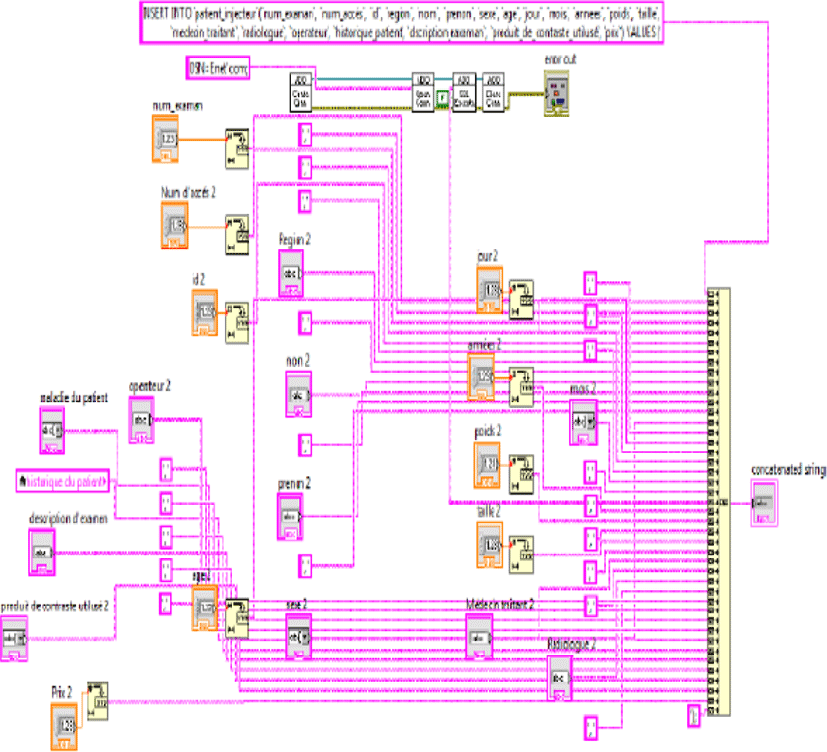
It tests if the patient is diabetic, has a dehydration, myeloma [20] or his age over 65 years if there’s not any problems, a message is displayed “Injection without risk and a hidden [21] (not visible in the front)led lights by pressing the OK button in the message. In case of problems (risk patient) it displays the message this is a risky patient, you need a recent blood serum creatinine less than three months. And a serum creatinine check box becomes visible on the face before Depending on the patient sex and the value of the serum creatinine is whether no risk, or he should calculate the clearance with a formula which differs depending on patient sex, clearance value, if the patient may have an injection, its coordinates [22] are established by MYSQL code.
After the registration of a new patient and the injection authorization comes the choice of the examination protocol [23]. And this called the choice of the anatomical part of the body that we need to visualize and diagnose in terms of medical imaging. Each protocol is characterized by a limited volume to choose, the flow and contrast of injection, the time between injections, and the acquisition of the x-ray image. If the radiologist makes a bad selection, the resulting image has a lower intrinsic quality that is why we choose to automate the insertion according to its last settings. By using some protocols, we have also defined sub protocols, if we choose two protocols at the same time, an error message list displayed.
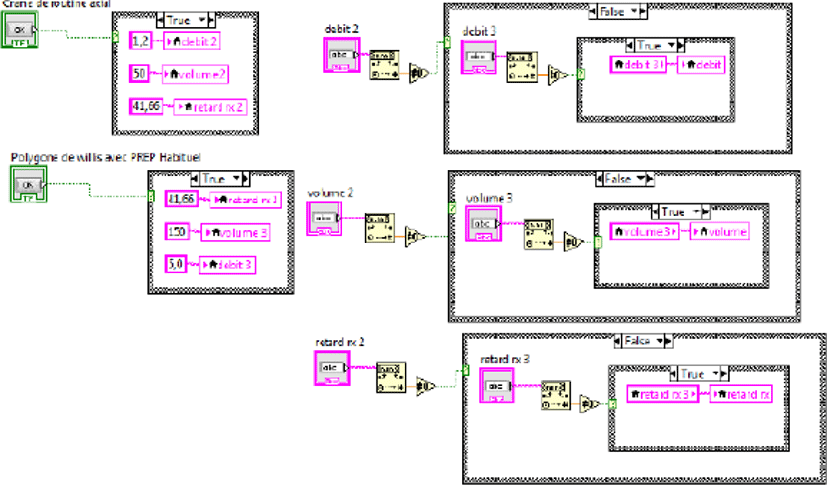
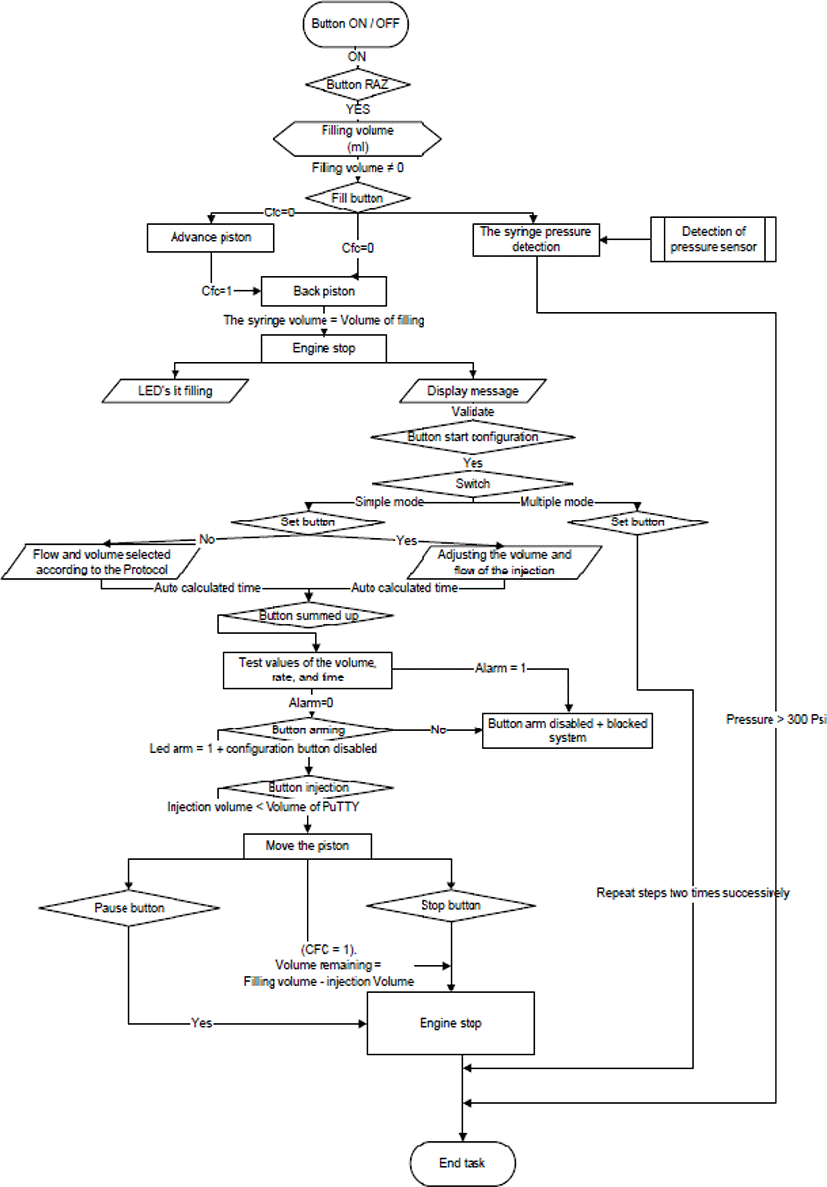
For electronic injection control, if we put the Switch ON/OFF state, an “Insert the desirable fill volume “message is displayed. If the fill volume is non zero, we can press the ‘AutoFill’ button. The piston advances until reaching end running sensors (CFC) and (CF) glows. The system starts filling back the piston with a low flow. When fill volume is reached, the motor stops. The charging LED is a displayed lit filling successfully completed message. The ‘Start configuration button’ is pressed then. If it is a single injection, first press the “Configuration button”, then enter either a volume and a debit if the « settings button » is switched ON, or a volume and a debit are automatically inserted according to the testing protocol already selected protocol if the « setting button » is enabled.
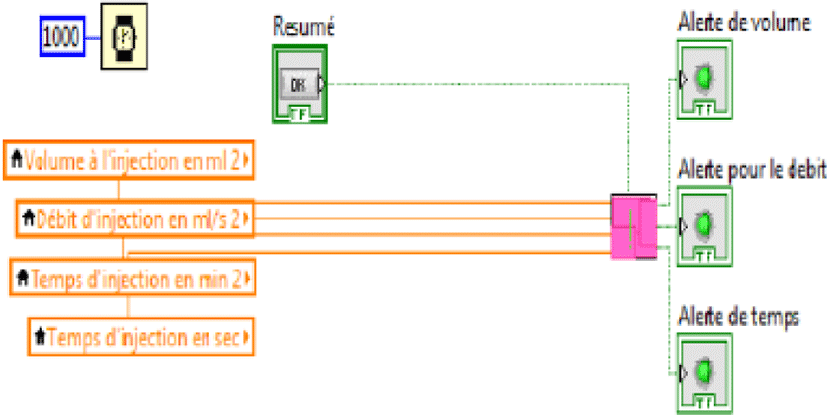
Subsequently, the time is automatically calculated and the ‘summarize button’ is finally activated. If the volume of the injection is not within the acceptable range, the following message will appear in the device ‘the volume of the injection is not accepted. The volume and value must be between 10 ml and 200 ml’. if the rate of injection is not in acceptable range, a message will appear ‘injection flow rate is not accepted, the value must be comprised between 0.1 ml/s and 9.9 ml/s» and the suitable “Armer button” remains disabled. However, if it is a multiple injection, this last step needs to be produced once again. Otherwise, press “Button Armer” so “Buttom configuration” becomes disable and the LED arm light.
If you press ‘Button injection’, in that case, when we detect a volume greater than the volume of the injection, the piston advances and the injection LED lights to approve the system state. If the injection is complete or well: CFC = 1, or “Stop button” is pressed, the motor stops. If “Pause button” is pressed, the motor stops without disarming the injection or clear the settings for a maximum time of 10 minutes. If we press ‘Reset button’ ‘Reset button’, all parameters are initialized to zero.
When facing technical problems, users need to Press on the maintenance button Figure 14. Hence, an e-mail will be sent to the service technician’s email.
To perform a required function. We propose that the maintenance to be divided into two types: Figure 15 curative Maintenance it relates to equipment failure or break and preventive Maintenance:
keyboard and display, test control alarms, linearity, flow control, control of the autonomy of the batteries. We have planned in our interface to update with all the unit problems. After the choice of technology, we can add another patient in the database figure 16 or search a registered patient.
We present in the figure 16 the shoot syringe control alghorithm. We put the Switch select state; all parameters are automatically initialized to zero. There is then a detection of the presence of the syringe by sensors; syringe becomes visible on screen. Otherwise, the syste m expects this action then there is a detection capacity of the syringe by a sensor from diameter, the syringe displayed on the screen changes the value of the volume according to the detected capacity. Otherwise, the system waits for this action. Subsequently, the dose (μg/kg/min) infusion. The speed of infusion (ml/h) will be automatically calculated and compared with a well- defined margin of speed depending on the capacity of the detected syringe. If the injection speed is not within the acceptable range, these messages are displayed: we should either change the speed or even change the syringe used. Visual alarm «LED by infusion rate «is turned on. If the speed is acceptable, “Infusion rate Led” visual alarm is switched off.
A pressure sensor displays 3 pressure levels: level L (very sensitive 40.7 kPa 13.3kPa), level C (required sensitive 66.7 kPa 13.3kPa) and level H (sensitive 106.7 kPa 26.7kPa). Depending on the choice of action, we will act on the system. If we press ‘Purge button’,
The piston advances by emptying the entire volume in the syringe until reaching end running sensor (CFC) and (CF) glows.
If the fill volume is reached, the motor stops, the charging led lights and the message “Filling successfully completed” is displayed. By pressing injection we note that if the injection volume is less than the volume of filling, the piston advances and the “injection Led” lights.
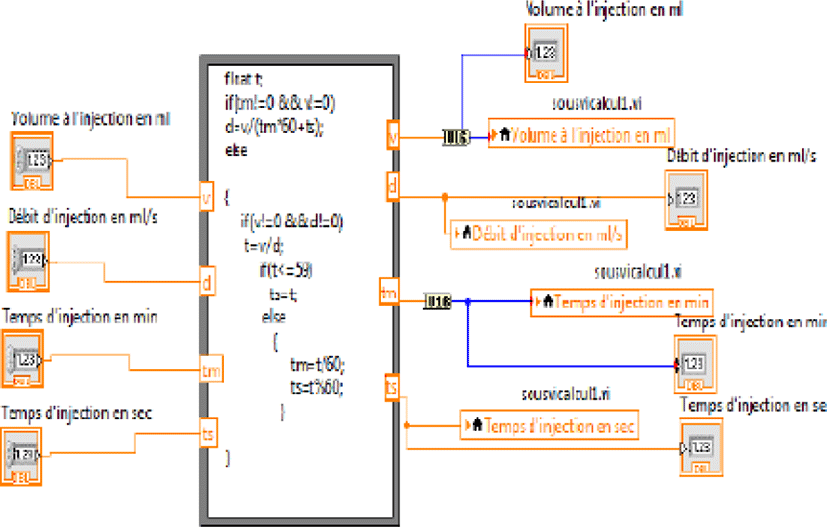
For parameters calculate of the stepper motor control, we need to vary period of a clock to change injector speed and the number of steps performed by the engine that in its turn can make changes injection volume. (distance browsed by the syringe syringe).
Although gradually abandoned by Universal serial Bus (USB), serial (Rs232, Rs422, Rs449, Rs423 and Rs485) is a common means of communication for the transmission of data between a computer and a device.
The serial link is an asynchronous binding no transmit any clock signal. So that the receiver can interpret properly the transmitter information: the two elements should be configured the same way.
We need to specify four parameters for the communication type: the transmission baud rate, number of data bits, and the polarity of the parity bit (even/odd), the stop bits number. The following figure 18 is the format type of a frame sent by the port series.

The Start bit initiating that information is to be sent. It allows the synchronization of receiver, seven or eight (7 or 8) bit data (B0 to B6) with B0 the low order bit (LSB) and B6 the most significant bit (MSB). The parity bit can detect any transmission errors.
IV. ELECTRONIC DESIGN OF THE PROPOSED SYSTEM
Used stepper motor is an engine has four wires to control coils per pair. The motor coils are connected with two series and driven together. It has therefore finally two windings in order since both mounted in series are more one.
The placement and part of the permanent magnet rotor to control the latter. If we decide to make pass between points C and D to power the coil from left and right, a current will settle and two electromagnetic fields will appear on part with other rotor.
Rotor magnet turns on itself to stand figure 19 so that its north pole is opposite the south pole of the magnetic field created in first coil and that its south pole faces the north pole in the second reel if then it feeds no longer coils between C and D but rather those between A and B the rotor will then turn to align again towards the poles that interest him again, it will feed the coils between D and C, so with current of opposite both sign where it fed between C and D (e.g. C was connected to “+” power earlier and there was passing to the “-”, Ditto for D that pass from “-” to the “+”) and the engine will still make a quarter turn can continue like this to rotate the motor being careful not to err in the supply phases as figure 20.
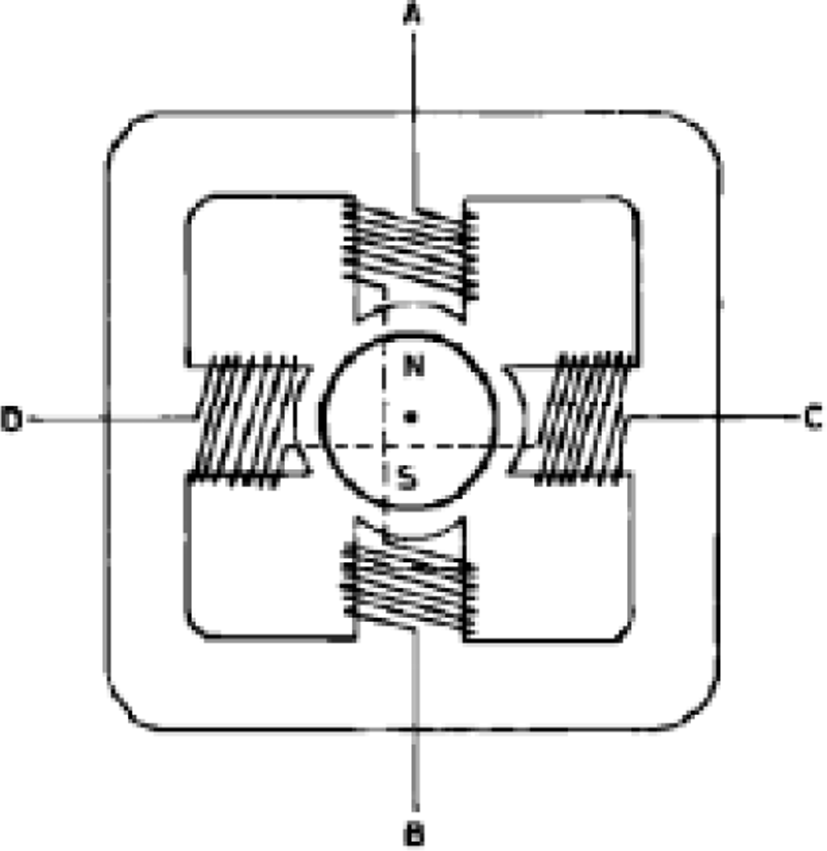
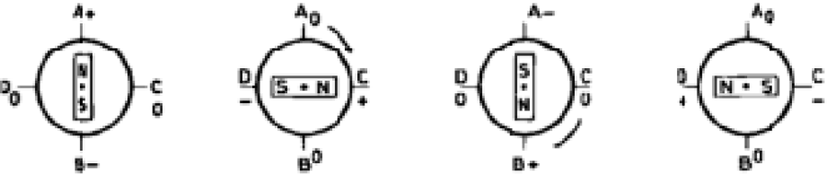
Rotation quarter is called a step, and as it takes several steps to make the engine 360°, called, the step-to- step motor. In the case shown above, so that the engine steps per revolution. Their mechanical constitution is different, this power, although the operation remains the same, because it always seeks to attract a magnet with fields created by coil travelled. For more step, we multiply the magnets in center. In our case and test practice our engine makes 12 steps per revolution.
We calculated the shift rod (syringe) a distance accurate to reach a given point. It will transform the movement running engines, called a rotary motion, a moving Rod straight, what is called a linear movement or a translation.
The movement is transmitted by obstacles, teeth, which ensure the absence of slip during operation. They are very often used to adapt the energy produced by the electric motors. Gear consists of toothed wheels, five wheels are used as shown in figure. 20, we define:
-
N1: Number of teeth of the wheel 1.
-
N2: Number of teeth of the wheel 2.
-
N3: Number of teeth of the wheel 3.
-
N4: Number of teeth of the wheel 4.
-
N5: Number of teeth of the wheel 5.
-
Θ1: angle travelled corresponds to wheel 1.
-
Θ2: angle travelled corresponds to roue 2.
-
Θ3: angle travelled corresponds to wheel 3.
-
Θ4: angle travelled corresponds to wheel 4.
-
Θ5: angle travelled corresponds to roue 5.
When the first turns (θ1=2π), we want to seek Θ5 based on Θ1.
(Two wheels on the same axis).
So, when the first wheel turns (2π), the fifth makes angle of 0.7 × π.
The screw/nut system is often used to transform a rotation in translation.
When the wheel turns, the nut advance the lead screw then moving the syringe of the same distance not the nut stem; you define:
P = 1mm with p = no worm.
L: Displacement (mm).
N tours: number of revolutions.
Where the relationship:
If the first example makes a full turn (θ1=2π), syringe advance 0f 0.35 mm this value has been well verified in practice. Shoot syringe contains mainly four sensors:
A syringe sensing: this is a simple switch open when at rest.
A syringe diameter detection sensor: it is a combined two switches open or closed depending on the diameter of the syringe (4possible combinations so 4 diameters accepted).
A sensor for detecting the speed and overpressure: this is analog sensor that generates a voltage proportional to the speed of the motor.
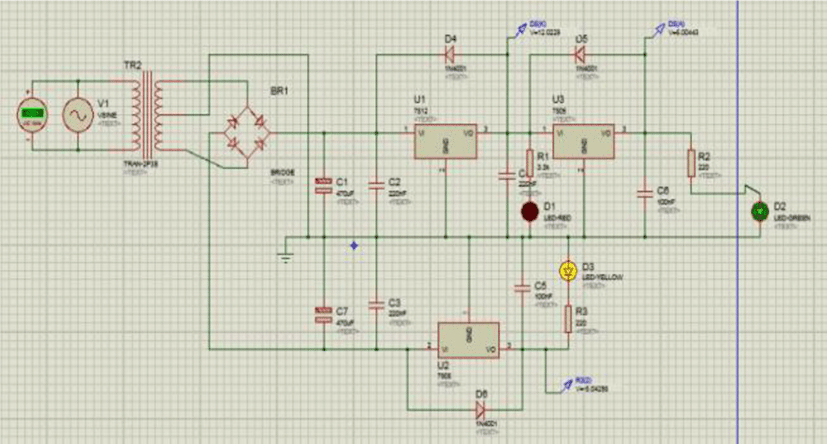
Electronics assemblies need to operate several constant voltage supplies. Our system needs a voltage continues 12V to power the power Board whose purpose operate on the stepper motor, and two voltages +/-5V and for the adaptation of the sensors (power amps) card and the power supply of the sensors themselves. The most commonly practiced technique for these tensions is to:
Lower the voltage of the AC mains using a transformer
Straighten the AC voltage delivered by using the bridge Grates.
Filter voltage recovered previously using polarized capacitors to eliminate undulations.
Regulate voltages using the 7812 Reg., 7805 and 7905 to obtain the needed voltages 12V, 5V and -5V.
The following figure shows a picture of the prototyped Map.
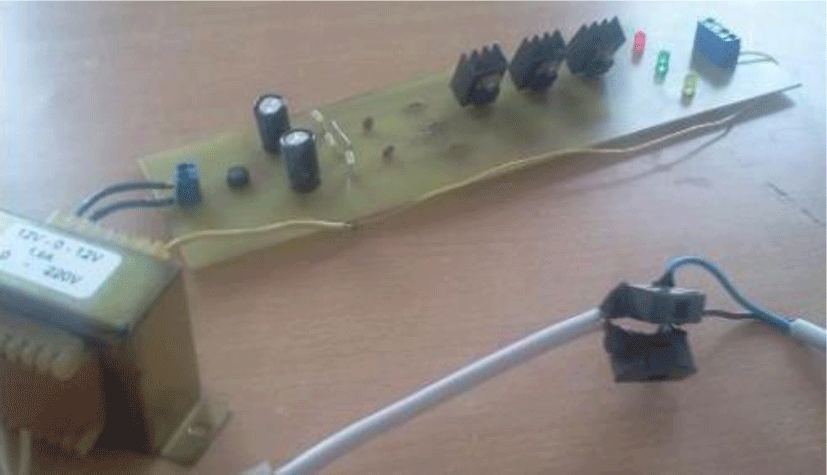
The sensors used in the shoot syringe are passive sensors (of the switches, with the exception of the speed sensor). It took, therefore, develop a power supply for these sensors Map. The principle we have chosen is simple tees: we put the sensor in series with a resistor and DC voltage equals to 5V.
Two cases arise: If the sensor is not activated (switch open) the output is 5V.
If the sensor is activated (switch closed) the output is 0V. Choice of the value of resistor R1: it is better not to exceed consumption of 20 mA a programmed output pin. It doesn’t exceed total 200 mA.
We can then calculate the resistor R1 minimum value:
where Imax is the supported current. In our case, we took a resist-or R1 (10kΩ).
where
In our case, the current does not exceed the values 0.5MAn over one pin.
We used total 5-pin (from 5 sensors) which gives a total consumption of 2.5 mA, largely below the 200mA. To control the stepping motor and because the signals gene- rated by the microcontroller are very low currents, has used a circuit specialist the L298, which is the current amplifier, it has two power pins one for motor (12V) and the other for the internal logic (+5V, mass). diodes must have low switching times, able to pass a significant current. The Figure 23 presents the schema of the power card. It has been simulated and validated see Figure 24.
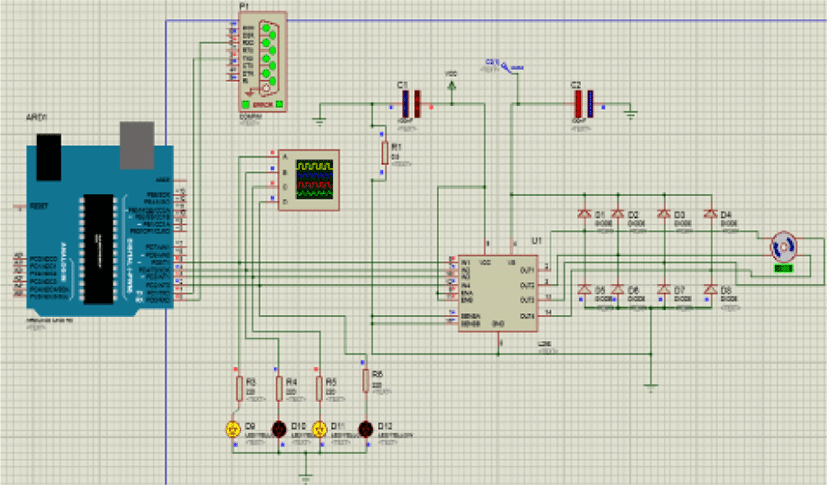
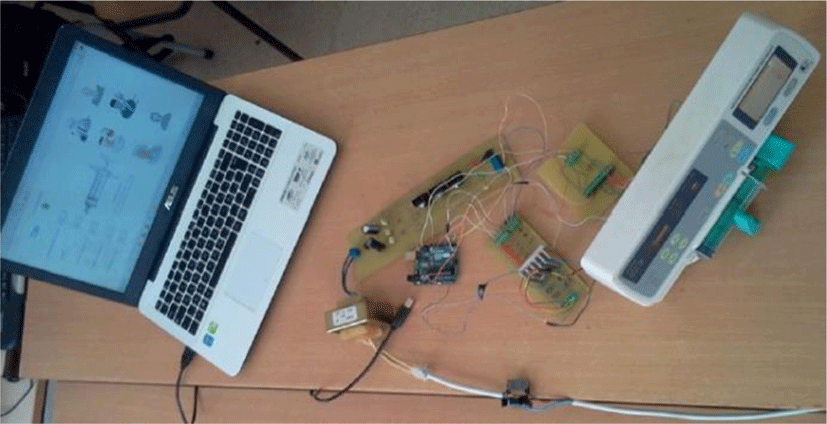
Communication interface based on Arduino Uno card operates with computer, sensors and the power may. During our manipulation in our Research Laboratory, we conclude that the used carte communicates easily with Labview software; in addition, its price is quite reasonable. In our work, we used the arduino Uno which is a card based on ATmega328 and Atmega 8U2 programmed USB-to-Serial converter.
It is composed by:
14 digital input / output pins (6 used as output PWM (modulated pulse width).
6 analog inputs (used in digital input / output pins).
Quartz 16 Mhz.
USB connection.
Power jack connector.
(Reset) button.
The Arduino Uno card contains all that is necessary for the microcontroller operating step:
Connected it to computer using a USB cable (or power it with an adapter sector or a battery, power supplied by the USB port). All Arduino pins are programmed as input or output digital (but not both at the same time). For example, on the Arduino Uno, it is on one hand of the numbered pins from 0 to 13 but also pin A0 to A5.
A programmed pin can thus be:
∞An input: the program can read a voltage on this PIN. As this voltage is interpreted as a binary digit (0 or1), the Arduino Uno datasheet ensures that any voltage less than 1V is considered as 0, and any voltage greater than 3, 5V is considered as 1. Between the two, it is blurry.
∞Output: the program can write a binary digit, figure that in the program are named High for 1 and Low to 0, which will be translated into a voltage of 15V and 0V for 0.
Inputs and Outputs configuration of the.
Decomposition of frame sent by Labview interface.
Reading of the sensor inputs.
The control voltages Generation engine.
Pin 11 is reserved for the sensor end race. Pin 10 is reserved for the sensor to detect presence of the syringe. Pin 9 is reserved for the speed sensor. Operate analog input is the A0 pin reserved for the pressure sensor. Output is digital for control.
Developed board receives a plot of data, the breaks initially determining the first separator index, the second separator and the index of the last character of this frame. The 3 frames frame direction motor, time between pulses and number of motor steps (in round, the engine makes 12 steps).
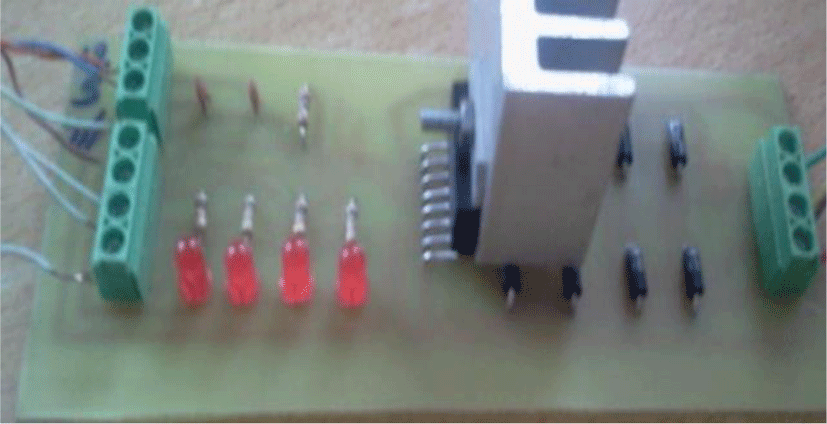
The following figure shows the picture of the developed prototype. It recalls that is composed mainly by parts:
V. CONCLUSION
We have successfully designed and implement a new system which ensure both the electric syringe pump and the electric injector operation. System introduces several additional options such development of a patient database, injection automation operation. We successfully developed and operate a software to create for visualization an interface control. User can manage a syringe in two C modes of technology. Developed program consists of two linked parts. If mistakes are made such as radiologist bad target selection, the resulting image has a lower intrinsic quality. The new solution performs syringe function and electronic injector, offers additional options as developed database. We detailed a various developed interfaces which allow a part of seized and preserve data from patients and calculate the injection parameters and control the motor step by step to enable the operation of electronic injection. Developed Shoot syringe different electronic cards are simulated and prototyped, in addition, maps are driven, prototyped, and different tests are accomplished in the Khurma University College, Taif University, Kingdom of Saudi Arabia.